Check out this comparison of letter boards from different brands to see the features of each one and how they differ in making a decision on which to purchase.
I’m sure you have seen the big craze with letter boards recently that seems to be blowing up on everyone’s Instagram and social media posts. I love seeing all the clever sayings that people come up with to make you smile. I can’t wait to share mine in the near future now that I have my very own letter boards.
I recently saw that Walmart had them and couldn’t believe it. Some of them are so expensive, so I couldn’t wait until they were finally available in my store. I ended up seeing a little different style of one in Joann and couldn’t resist since I had a coupon to use for it.
That’s when I decided that I would share them both with y’all in a video so you could see them up close and personal but also side by side. I share the good and bad with both and what I like about each one. Check out the video below to see it all and subscribe to my YouTube channel while you’re there if you would like to see more goodies like this one.
There are definitely differences between the two with both having great qualities. Which one would you rather have? What do you like best? Any good phrases or quotes I could use on mine? Leave them below in the comments for me. I would love to hear them.
https://www.thesoutherncouture.com/staging/3818/wp-content/uploads/2017/07/Comparison-of-Letter-Boards-from-Different-Brands-FI.jpg400800Bethanyhttps://www.thesoutherncouture.com/staging/3818/wp-content/uploads/2017/09/logo_freelance.pngBethany2017-07-15 05:00:502017-07-14 23:15:20Comparison of Letter Boards from Different Brands
Get ready for the next school year when you create a portable homework station using a serving tray that can move around to any corner of your house helping take the stress out of school work.
This post is sponsored by Dayspring. All opinions are mine alone. I pinky promise! Some of the links below are “affiliate links.” This means if you click a link and purchase an item, I will receive a small affiliate commission that helps me to be able to continue with this blog and hopefully continue to inspire you as well.
Now let’s just go ahead and face it. I know none of us want to even start talking about that dreaded work that starts with an “S”. School, yes and that means homework will be soon to follow. As much as we don’t even want to think about it, back to school time will be here before we know it.
I love summer, and I’m enjoying every minute of it. But I do know that reality will be slapping me in the face again very soon with early alarm clocks, packed lunches, and schedules to keep. That’s why I want you to be able to prepare ahead to eliminate as much stress as possible when you create a portable homework station using a serving tray.
Most of you probably have a desk in your child’s bedroom or a common area with a family computer, but let’s be real once again. Getting your kids to do their homework isn’t always this beautiful scenario where they sit down perfectly at their desk and get straight to work. Getting them to work in any room or space is a success. This portable homework station makes it where you can go straight to them for any help they may need.
I am using a three shelf cart that is metal with wooden shelves. It does roll on wheels which makes it portable but not so much if I have a printer plugged in. This wooden tray is from Dayspring and works perfectly for this especially with the vintage style map on the bottom. Plus the wood is extremely durable and will withstand many future school years.
I decided to place my serving tray on top with different school supplies that could be easily transported. I placed index cards, sticky note pads, calculator, memo book, glue stick, and crayons.
Sitting on the shelving beside the tray is this gorgeous tabletop globe that I fell in love with immediately. You can grab this beauty from Dayspring as well. It matches the tray perfectly and is part of their (in)courage collection. *Y’all know how much I love the (in)courage community. This handlettering, “We all belong to each other,” is just precious. Plus the globe could be used for any geography homework too.
Sitting on the top is a cup holding pencils, colored pencils, highlighters, and scissors. Place the cup on the tray and just take it wherever you need it. *I think I might just have to make one of these designated for my favorite Bible journaling supplies too.
Now how cool is it that you have one less thing checked off your list when school starts back. That first homework assignment your kids bring home will be a breeze when everything is organized and right at their fingertips.
Make sure to grab your serving tray and globe now to have time to get yours together. The great news is that they are now on sale at 50% off but only for a limited time so you better get them now!!!
https://www.thesoutherncouture.com/staging/3818/wp-content/uploads/2017/07/Create-a-Portable-Homework-Station-using-a-Serving-Tray-FI.jpg400800Bethanyhttps://www.thesoutherncouture.com/staging/3818/wp-content/uploads/2017/09/logo_freelance.pngBethany2017-07-11 05:00:222017-07-10 09:51:40Create a Portable Homework Station using a Serving Tray
Give your kitchen countertops some organization with this palm tree stenciled catch all tray while adding some color and tropical feel.
Hope y’all are enjoying your Summer so far. I am loving the warm weather and spending time with family and friends. There is just something nice about slowing down and enjoying everyday more. My feature for this week is sure to keep your summer vibes alive. Keep reading to check it out.
But first check out what my fellow bloggers have been up to and don’t forget to check out my feature for this week as well.
Ready to share what has been motivating you this past week? Link up a recent post of yours that motivates you to create or just be awesome! Our goal is for this link up to focus on craft, DIY, & home posts so please try to remember that when linking up.
Limit three links per week and remember to link directly to your post, not your blog.
Do not link stores, giveaways, or other link parties.
Be sure to hop around some of the other posts that have been linked up to share the love and get motivated by what others have been up to.
By adding your links, you are stating that you have the proper licensing/rights to the images in your blog posts.
Each week, your hosts will choose a post to feature from the previous week. If you want a chance at being featured, you must follow all of the hosts in someway. By linking up, you agree to let each host share your photo and link back to your site, as well as receive a weekly e-mail letting you know when the party is live. We will never give your e-mail or info to anyone, nor will we spam you!
The Creative Corner link party goes live Sunday 6pm PST and ends Thursday at 5pm PST.
This palm tree stenciled catch all tray is perfect for summer on your countertop or even on a patio table. I love the colors that Crafty Lumberjacks used with the tropical feel.
Don’t forget to grab this button if you’ve been featured.
Now it’s your turn to join in on the fun and link up your recent craft, DIY, or home posts so get ready to motivate others and be inspired! Don’t forget, if you want a chance to be featured next week to follow all of the hosts above!
Now hop over to all the other cohost’s blogs and see what caught their eye this week. You just might be featured there too!
https://www.thesoutherncouture.com/staging/3818/wp-content/uploads/2017/07/Tropical-2.jpg400800Bethanyhttps://www.thesoutherncouture.com/staging/3818/wp-content/uploads/2017/09/logo_freelance.pngBethany2017-07-09 21:22:102017-07-09 21:22:10Palm Tree Stenciled Catch All Tray
Check out this front door makeover using bright paint and no prep needed to add a fresh pop of color to your front porch space.
Y’all know how much I just love anything that is bright and colorful. Well today is no different! My feature for this week is taking a bright pop of color and using it perfectly just in time for Summer. You have to stick around to check it out too.
But first check out what my fellow bloggers have been up to and don’t forget to check out my feature for this week as well.
Ready to share what has been motivating you this past week? Link up a recent post of yours that motivates you to create or just be awesome! Our goal is for this link up to focus on craft, DIY, & home posts so please try to remember that when linking up.
Limit three links per week and remember to link directly to your post, not your blog.
Do not link stores, giveaways, or other link parties.
Be sure to hop around some of the other posts that have been linked up to share the love and get motivated by what others have been up to.
By adding your links, you are stating that you have the proper licensing/rights to the images in your blog posts.
Each week, your hosts will choose a post to feature from the previous week. If you want a chance at being featured, you must follow all of the hosts in someway. By linking up, you agree to let each host share your photo and link back to your site, as well as receive a weekly e-mail letting you know when the party is live. We will never give your e-mail or info to anyone, nor will we spam you!
The Creative Corner link party goes live Sunday 6pm PST and ends Thursday at 5pm PST.
I love using bright and cheerful colors to make a space really pop and shine bright. I fell in love with this front door makeover using bright paint and no prep needed from Lolly Jane. The coral pop of color is gorgeous and it’s so easy to paint over the color that was previously there. Amazing!
Don’t forget to grab this button if you’ve been featured.
Now it’s your turn to join in on the fun and link up your recent craft, DIY, or home posts so get ready to motivate others and be inspired! Don’t forget, if you want a chance to be featured next week to follow all of the hosts above!
Now hop over to all the other cohost’s blogs and see what caught their eye this week. You just might be featured there too!
https://www.thesoutherncouture.com/staging/3818/wp-content/uploads/2017/06/FI.jpg400800Bethanyhttps://www.thesoutherncouture.com/staging/3818/wp-content/uploads/2017/09/logo_freelance.pngBethany2017-07-02 21:00:232017-07-02 20:52:16Front Door Makeover Using Bright Paint and No Prep Needed
Get your back porch or patio ready for summer games with this outdoor patio painted tic tac toe game that is fun for everyone and easy to make.
Well Happy Summer to y’all! The first day of summer was last week and the weather and sunshine has just been beautiful. That’s why I fell in love with this week’s feature so much. You will have the whole family outside and enjoying the warm weather with this DIY game. Keep reading to get the full tutorial.
But first check out what my fellow bloggers have been up to and don’t forget to check out my feature for this week as well.
Ready to share what has been motivating you this past week? Link up a recent post of yours that motivates you to create or just be awesome! Our goal is for this link up to focus on craft, DIY, & home posts so please try to remember that when linking up.
Limit three links per week and remember to link directly to your post, not your blog.
Do not link stores, giveaways, or other link parties.
Be sure to hop around some of the other posts that have been linked up to share the love and get motivated by what others have been up to.
By adding your links, you are stating that you have the proper licensing/rights to the images in your blog posts.
Each week, your hosts will choose a post to feature from the previous week. If you want a chance at being featured, you must follow all of the hosts in someway. By linking up, you agree to let each host share your photo and link back to your site, as well as receive a weekly e-mail letting you know when the party is live. We will never give your e-mail or info to anyone, nor will we spam you!
The Creative Corner link party goes live Sunday 6pm PST and ends Thursday at 5pm PST.
Get your family ready for the beautiful outdoors and warm weather this summer with this outdoor patio painted tic tac toe game from 100 Things to Do. Pick some bright colors and get started making yours just in time for any summer cookouts.
Don’t forget to grab this button if you’ve been featured.
Now it’s your turn to join in on the fun and link up your recent craft, DIY, or home posts so get ready to motivate others and be inspired! Don’t forget, if you want a chance to be featured next week to follow all of the hosts above!
Now hop over to all the other cohost’s blogs and see what caught their eye this week. You just might be featured there too!
https://www.thesoutherncouture.com/staging/3818/wp-content/uploads/2017/06/Outdoor-Patio-Painted-Tic-Tac-Toe-Game-FI.jpg400800Bethanyhttps://www.thesoutherncouture.com/staging/3818/wp-content/uploads/2017/09/logo_freelance.pngBethany2017-06-25 21:00:552017-06-25 15:54:19Outdoor Patio Painted Tic Tac Toe Game
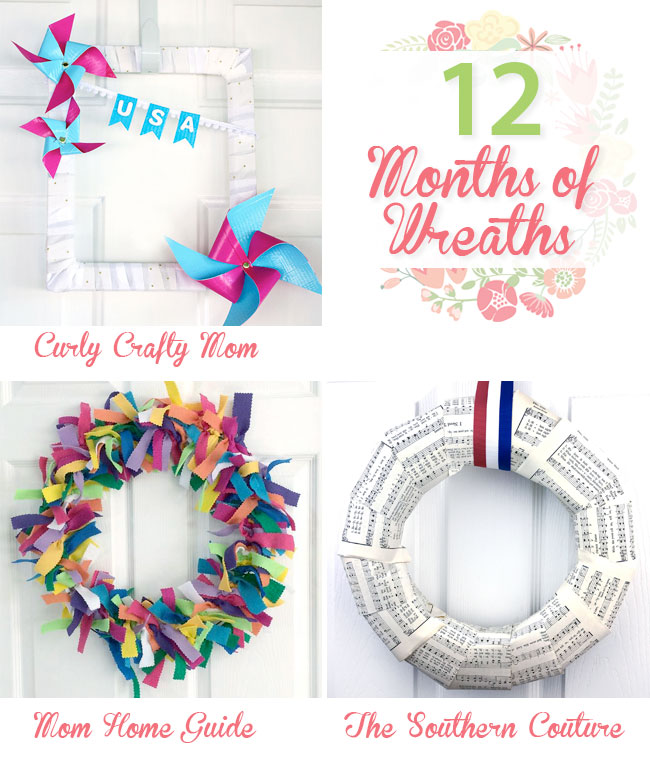
Check out this patriotic wreath tutorial using old hymnal pages and just a few basic supplies. You can make this wreath in less than 10 minutes.
This post is sponsored by FloraCraft. All opinions are mine alone. I pinky promise! Some of the links below are “affiliate links.” This means if you click a link and purchase an item, I will receive a small affiliate commission that helps me to be able to continue with this blog and hopefully continue to inspire you as well.
Who doesn’t love a good project or craft that you can literally make in less than 10 minutes. I know I do. And then when it’s a gorgeous wreath, it’s even better. Wreaths don’t have to be complicated or expensive.
That’s why I’m so excited to bring you this patriotic wreath tutorial using old hymnal pages just in time for July 4th. Hymnals make me think of our beautiful church and faith that our country was founded on. What else could be more fitting for a wreath this time of year? *Plus stick around for more ideas from a couple of my friends for part of our 12 Months of Wreaths Series.
Check out this video showing you how to make your own. More written details are below.
I got these old hymnal books that I used from my grandfather before he passed away which makes them even more special. You can find them at local thrift stores sometimes. Just keep your eyes out. If all else fails, you can also use regular book pages. Cut the pages in half in small strips.
Wrap the strips of the hymnal pages around the wreath attaching each one to the back using the floral pins. These pins are amazing. I can’t believe I hadn’t discovered them already. They are so quick and easy to use.
Wrap a ribbon around the top and tie in a knot. Hide the knot to the back of the wreath using a floral pin.
Then all you have left to do is just enjoy this beauty and hang it for all to see.
The great part is you don’t have to spend a lot of time making it either. I just love the simple touch of patriotism!
Now if that wasn’t good enough, be sure to check out the other wreath ideas below from my friends for this month’s wreath series.
Thanks again for joining us! We will be sharing a new wreath once a month in 2017! Are you interested in sharing a wreath with us one (or more) months? We are accepting guest hosts! Email carrie (at) curlycraftymom (dot) com if you are interested!
Make sure to check out these wreaths that you could make for a fun summer craft project. Perfect to even make with your kids too. I hope you enjoy! Please let me know in the comments below if you decide to try one of these. I would love to see a picture too.
https://www.thesoutherncouture.com/staging/3818/wp-content/uploads/2017/06/Untitled-design-8.jpg400800Bethanyhttps://www.thesoutherncouture.com/staging/3818/wp-content/uploads/2017/09/logo_freelance.pngBethany2017-06-19 00:05:222017-06-19 00:02:06Patriotic Wreath Tutorial Using Old Hymnal Pages
Give your front porch a quick and easy makeover when you learn how to paint a doormat using stencils and spray paint with this tutorial.
Happy Father’s Day to any men that may be here or to all your husband’s and Dad’s that are celebrating today. Fatherhood is so important and such a vital part of a child’s life. Today I celebrate with y’all all the wonderful Dad’s and men in our lives. But…that doesn’t mean us women still can’t party and have some fun today too. Enjoy this week’s feature that is perfect for a quick summer craft project.
But first check out what my fellow bloggers have been up to and don’t forget to check out my feature for this week as well.
Ready to share what has been motivating you this past week? Link up a recent post of yours that motivates you to create or just be awesome! Our goal is for this link up to focus on craft, DIY, & home posts so please try to remember that when linking up.
Limit three links per week and remember to link directly to your post, not your blog.
Do not link stores, giveaways, or other link parties.
Be sure to hop around some of the other posts that have been linked up to share the love and get motivated by what others have been up to.
By adding your links, you are stating that you have the proper licensing/rights to the images in your blog posts.
Each week, your hosts will choose a post to feature from the previous week. If you want a chance at being featured, you must follow all of the hosts in someway. By linking up, you agree to let each host share your photo and link back to your site, as well as receive a weekly e-mail letting you know when the party is live. We will never give your e-mail or info to anyone, nor will we spam you!
The Creative Corner link party goes live Sunday 6pm PST and ends Thursday at 5pm PST.
I love projects and crafts that are quick and simple. And that is exactly what A Fresh Squeezed Life has brought us this week. I’m so glad she shared this tutorial to learn how to paint a doormat using stencils and spray paint. I am definitely going to be on the lookout for a new doormat, or I may just have to redo ours that we have now.
Don’t forget to grab this button if you’ve been featured.
Now it’s your turn to join in on the fun and link up your recent craft, DIY, or home posts so get ready to motivate others and be inspired! Don’t forget, if you want a chance to be featured next week to follow all of the hosts above!
Now hop over to all the other cohost’s blogs and see what caught their eye this week. You just might be featured there too!
https://www.thesoutherncouture.com/staging/3818/wp-content/uploads/2017/06/How-to-Paint-a-Doormat-Using-Stencils-and-Spray-Paint-FI.jpg400800Bethanyhttps://www.thesoutherncouture.com/staging/3818/wp-content/uploads/2017/09/logo_freelance.pngBethany2017-06-18 21:33:272017-06-18 21:33:27How to Paint a Doormat Using Stencils and Spray Paint
Add some new style to your house with these vintage farmhouse style terra cotta flower pots with a simple whitewash technique that only takes minutes.
Well it’s been a beautiful and productive week around my house. I’m always looking forward to the beginning of the next week and planning for a fresh start. What about you? Any big plans for this week? Maybe consider adding in my feature this week for a fun craft. Keep reading to see below.
But first check out what my fellow bloggers have been up to and don’t forget to check out my feature for this week as well.
Ready to share what has been motivating you this past week? Link up a recent post of yours that motivates you to create or just be awesome! Our goal is for this link up to focus on craft, DIY, & home posts so please try to remember that when linking up.
Limit three links per week and remember to link directly to your post, not your blog.
Do not link stores, giveaways, or other link parties.
Be sure to hop around some of the other posts that have been linked up to share the love and get motivated by what others have been up to.
By adding your links, you are stating that you have the proper licensing/rights to the images in your blog posts.
Each week, your hosts will choose a post to feature from the previous week. If you want a chance at being featured, you must follow all of the hosts in someway. By linking up, you agree to let each host share your photo and link back to your site, as well as receive a weekly e-mail letting you know when the party is live. We will never give your e-mail or info to anyone, nor will we spam you!
The Creative Corner link party goes live Sunday 6pm PST and ends Thursday at 5pm PST.
Check out these vintage farmhouse style terra cotta flower pots from Making it in the Mountains. She has the most beautiful style and these are no different. Plus they only take a few minutes to complete. Get her DIY tutorial and make some this week.
Don’t forget to grab this button if you’ve been featured.
Now it’s your turn to join in on the fun and link up your recent craft, DIY, or home posts so get ready to motivate others and be inspired! Don’t forget, if you want a chance to be featured next week to follow all of the hosts above!
Now hop over to all the other cohost’s blogs and see what caught their eye this week. You just might be featured there too!
Stay organized with planner tips and ideas using the Illustrated Faith Planner, washi tape, page flags, sticky notes, colored pens, and more.
This post is sponsored by Dayspring. All opinions are mine alone. I pinky promise! Some of the links below are “affiliate links.” This means if you click a link and purchase an item, I will receive a small affiliate commission that helps me to be able to continue with this blog and hopefully continue to inspire you as well.
Let’s talk Planners and Organization… Are you a paper and pen kind of girl that loves to make lists and document daily living? If you are reading this, then chances are you love planners and finding new ways to stay organized just as much as I do. My latest obsession in planning is this brand new 18 month planner from Illustrated Faith and Dayspring.
The cover starts with a beautiful quote in gold foil and a gold ring binding. They also have several other styles to choose from with all having inspirational quotes throughout to encourage you. You won’t find other planners quite like these.
I thought it would be fun to show you my planner in a video and how I plan to use it to stay not only organized but also to document my faith journey. I think this would be so fun to look back on just as you would a journal years from now. Check out my latest video on YouTube walking you through the entire planner where you can see the details more up close and personal.
I also show you in the video a few of my favorite supplies to use in my planner and different ways that you can use them as well. Trust me when I say this planner can definitely be used as a memory journal or praise book to document different seasons of your life.
You will find monthly view, weekly views, year at a glance, list of holidays, notes section, pages of stickers, a folder insert, and so much more.
My Monthly View
My Weekly View
A Supply Dashboard I made within the pages of the planner
I would love to know which planner you decide on. Please let me know in the comments below and also give me any tips you have to stay organized in your planner. I love learning new techniques. Plus don’t forget to check out the video to see more detail up close.
https://www.thesoutherncouture.com/staging/3818/wp-content/uploads/2017/06/Stay-Organized-with-Planner-Tips-and-Ideas-Using-the-Illustrated-Faith-Planner-FI.jpg400800Bethanyhttps://www.thesoutherncouture.com/staging/3818/wp-content/uploads/2017/09/logo_freelance.pngBethany2017-06-07 15:20:232017-06-07 15:20:23Stay Organized with Planner Tips and Ideas Using the Illustrated Faith Planner
Find out the answer to your question, “Will I be required to use cartridges with the Cricut?” and also a fun and simple tutorial using Cricut pens and cardstock.
Thank you to Cricut for sponsoring this post and making it possible for all of us to enjoy crafting so much more. All opinions are mine alone. I pinky promise! Some of the links below are “affiliate links.” This means if you click a link and purchase an item, I will receive a small affiliate commission that helps me to be able to continue with this blog and hopefully continue to inspire you as well.
So many people love the idea of having a Cricut cutting machine and everything they could make. Then they get their machine but still have so many questions and feel overwhelmed not knowing where to even start. One of the most popular questions people have is “Will I be required to use cartridges with the Cricut?”.
Will I be required to use cartridges with the Cricut?
I am here to answer that question and share a step-by-step tutorial to get even the most beginner started crafting in no time and in confidence. But first make sure to check out my Cricut Intro post if you are interested in more about what the Cricut is exactly and what all it can do.
The previous Cricut machines would require cartridges at times to be purchased and placed into a slot on the machine which could then be accessed directly on the machine and cut out. The more updated machines still allow you to use previous cartridges with a slot on the machine, but it certainly isn’t necessary. The Design Space software gives you access to tons of images and files that you can cut. You can also purchase an Access Membership giving you access to the files at a discounted price.
The other beauty of Design Space is the Make It Now Projects. You will find tons of projects with cut files and directions to get started right away. You don’t have to have a cartridge at all with these. You don’t even have to think up your own idea. Get started using others creations and have some fun of your own.
One category of the Make It Now Projects that I want to feature are the Cards. You can find tons of ideas for just about any card you want. Everything is already there and just waiting for you to cut them out.
For cardmaking, you are going to need some pretty cardstock. Let me suggest a couple different packs that Cricut has. The quality is superb with a thicker paper that is sure to be durable and professional looking.
The beauty about Cricut and cardmaking is that the Cricut will not only cut out everything you need but also write any phrase or design on the card as well. Below is their Ultimate Pen Set full of bright colors and a white stand to even hold them all.
Another fun extra to use with cardmaking is Cricut’s Paper Crafting Set.
It includes:
Piercer
Quilling Tool
Edge Distresser
Craft Mat
This set is just a fun way to top things off and take your cards and paper projects to the next level. It truly is all in the little details.
Now that we have our supplies pulled together, let’s walk through step-by-step how to create Make It Now card projects in Design Space.
On the home page of Design Space, click on the right category box to see the full drop down menu of projects. I selected the Father’s Day cards.
You will see the supplies needed and directions to complete the card. You can customize the project but clicking the “Customize” button in the bottom right or click “Make It Now” to get started.
The next preview screen will show the different cuts and mats that will be needed. Press GO in the bottom right to start the process of loading your mat and cutting. *Don’t worry about knowing exactly what tools are needed for which mat. The software will prompt you when needing to change different colored pens or scoring stylus, etc.
The next screen will then walk you through loading your mat, making sure the machine dial is set correctly, changing the different cardstock and tools between each mat, etc.
Once all the cuts are done and the phrase is written, you just need to assemble your card as stated in the project directions.
This “Hello Sunshine” card is another Make It Now card project that is adorable and uses several different pens for some gorgeous color combos.
And that’s all there is to it. You don’t have to worry about understanding all of Design Space right away or having to buy cartridges to be able to use your Cricut. The Make It Now projects make it so easy to get started right away no matter what your experience level may be.
https://www.thesoutherncouture.com/staging/3818/wp-content/uploads/2017/06/Will-I-be-Required-to-Use-Cartridges-with-the-Cricut-FI.jpg400800Bethanyhttps://www.thesoutherncouture.com/staging/3818/wp-content/uploads/2017/09/logo_freelance.pngBethany2017-06-07 05:00:182017-06-07 09:40:37Will I be Required to Use Cartridges with the Cricut?


 This
This