This shop has been compensated by Collective Bias, Inc. and its advertiser. All opinions are mine alone. I pinky promise! #RoofedItMyself #CollectiveBias
Your puppy will thank you once you have accomplished this adorable build. Get this building a breezy doghouse tutorial now that is easy to put together and complete.
Summer is most definitely here with the warm sunshine and good times spent outside. That means my furbabies will be spending more time outside playing and enjoying the fresh air with me. The only problem is that my youngest puppy, Jayda, really didn’t have a place of her own outside to relax. But not anymore…
That’s where this adorable and cheerful doghouse has come to the rescue. I couldn’t wait to share this building a breezy doghouse tutorial with y’all too. Your puppies will thank you and me! But how do I know that this doghouse will stand the test of time with the weather and being outside? That’s all thanks to GAF roofing products and Lowe’s.
Before we actually build this beauty, you are going to need to know exactly where to gather all your supplies. On the end of the roofing aisle at your local Lowe’s is a GAF Roofing Center (similar to the one below) where you will see all the different types of shingles and what you will need to get started.
I chose the Timberline® shingles in Natural Shadow®, and they are beautiful! I can’t believe even myself is calling shingles beautiful but I really do love the color choices and how rich they look. Plus they are so durable which is even better. I also used the FeltBuster® High-Traction Synthetic Roofing Felt and the Grip Rite 1 ¼” galvanized steel roofing nails.
I know what you must be thinking that GAF is usually thought of as a professional product for contractors only. But that is just not true. Their products are perfect for DIY enthusiasts and even the most novice so let’s get to building for your cute puppy too.
For the base of the doghouse, you will need wooden pieces in the following measurements:
4- 2″x2″x14.5″
4- 2″x4″x16″
4- 2″x4″x18″
Using wood screws attach the base of the doghouse as pictured below with the 18″ pieces for the bottom sides and the 16″ pieces in the middle.
Then add the remaining 2-18″ pieces at the top on each side just as the bottom.
To create the top of the doghouse, you will need:
1- 2″x6″x22″
4- 2″x4″x19.5″ cut at a 45 degree angle with the longest side of the wood still measuring 19.5″
Attach the angled pieces to the 22″ board as shown below. Then attach to the frame we built above using wood screws.
For the roof of the doghouse, you will need 6- 1″x6″x22″. Attach to the frame we previously built for the roof.
Now you are ready to attach the FeltBuster® to the roof using roofing nails. I just spread mine out and made sure it was smooth against the wood.
Add the Timberline® shingles on top. Be sure to line them up just right for the perfect color and style.
I painted the doghouse aqua and left some of the wood showing through for a more rustic look. I made a wooden sign and attached to the front of the doghouse using scrap wood, spray paint, vinyl, and my craft cutting machine.
I couldn’t be happier with the way this build turned out. Jayda seems to just love it and can relax while we are outside enjoying the warm sunshine.
Plus I love that I can depend on GAF and their roofing products to now provide shade and a sweet spot for my Jayda-Baby. I would love to know what project you have in mind to use GAF products as well. Please let me know in the comments below or share a picture with me on social media. If you are looking for ideas, then check out other project ideas HERE or follow them on Facebook.
You may be asking, “What tools and accessories do I need to use a Cricut and how much do they cost?”. Find all the answers you need to get started creating today.
Thank you to Cricut for sponsoring this post and making it possible for all of us to enjoy crafting so much more. All opinions are mine alone. I pinky promise!
Recently you may have seen some of the fun I was having using my Cricut Explore Air 2 on social media. When I’m having a blast, I just have to share. Check out my intro to Cricut post HERE if you are wanting more info about the actual machine itself.
That’s why I couldn’t wait to dive a little deeper and answer one of the most frequently asked questions about Cricut. “What tools and accessories do I need to use a Cricut and how much do they cost?” Plus you will want to stick around after that for a fun summer project using a new product of Cricut and their tools.
Once you have your Cricut cutting machine, you will need a cutting mat for sure to hold the material while the machine cuts it. The mats come in varying sizes and also grip strength. The mats have a different color for the different grips so that helps to keep them separate and not confuse them.
You have your Cricut machine and cutting mat, but now you need a few tools that will make your crafting life a whole lot easier. Cricut has an Essential Tool Set with 7 tools that is perfect for those getting started. All the tools included help with all the different materials you will be cutting. Plus they have tool sets now that will match your machine just perfectly. I am in love with the mint! Hands down!
The set includes a paper trimmer that can cut materials up to 12” wide along with a replacement blade for the trimmer. There is also a scoring blade that you can interchange when needing to add score lines to a project such as cardmaking, papercrafts, paper boxes, etc.
Below is a picture of the other tools included and a list of them (from left to right) so you know exactly what each tool does and is used for. (Still crushing over this mint. Eek!)
Scraper: to burnish material and clean all cutting mats
Scissors: to cut different materials, also includes a blade cover
Tweezers: to lift and secure delicate material
Weeder: to remove tiny negative cuts
Scoring stylus: to add fold lines to cards and envelopes
Spatula: to lift cuts from the mat
(Above info from Cricut.com)
Now do you technically have to have every single tool I mentioned above to complete a project using the Cricut? You do NEED the mat! The other tools are EXTREMELY helpful when completing projects, especially those that have very tedious and tiny cuts. Speaking of tiny cuts and using the tools, let’s jump into a project I finished recently that comes just in time for your gardening and fashion.
I decided to add a monogram to the sides of my gardening/rain boots for a little extra flair and shine.
Who says gardening can’t be fun and fashionable at the same time? I used the NEW holographic vinyl and couldn’t wait to see it glisten especially in the sunshine.
I designed my project in Cricut design space first. You can also check out the Make it Now projects for more ideas. Check out this similar one using a monogram. They will also help guide you through an entire project until you learn the software and feel more comfortable. Below is what my finished project looked like in Design Space.
Using the scissors from the Essential Took Kit, I cut out some of the pink holographic vinyl and placed it on my cutting mat. 1st, these scissors are awesome and cut so easily and smoothly. 2nd, how gorgeous is that new vinyl? I love the shine and look it gives depending how you look at it and at what angle.
Below is also a picture of the opal vinyl. In this shot, it looks like it is blue but still so gorgeous. Each one really has so many different shades of color too.
Once the Cricut has finished cutting my material and I’ve removed the cutting mat, I peeled back the larger section of negative vinyl. This picture shows you the back of the holographic vinyl and that gorgeous pink color that shines through.
Using the weeder, start removing the other negative vinyl. The sharp tip of the weeder is perfect for getting the vinyl pulled up and then you can just peel it back. The weeder also helps to remove even the tiniest, most intricate cuts that nothing else can usually.
I cut a section of the transfer tape and pulled the backing off while I adhered the tape to the top of my vinyl cut.
I removed the entire cut with the backing of the vinyl still intact and the transfer tape on top. This just makes it easier to work with to remove the backing from the vinyl.
Using the transfer tape, adhere the vinyl cut to your rain boot and burnish the vinyl. You really just want to make sure the entire vinyl cut is adhered with no air bubbles or wrinkles. This is where the scraper comes in handy to rub the vinyl down evenly. The layer of transfer tape will then easily peel away from the vinyl and rain boot.
Do the same thing to the other boot and you are ready to work in your flower beds or maybe just sport some pretty snazzy boots on the next rainy day. In the pictures below, I am using the opal holographic vinyl.
What projects would you want to make with the holographic vinyl? Let me know in the comments below.
Plus don’t forget to check out these new tool sets that come in matching colors to the cutting machines. You will love them! Plus they help tremendously. With a few basic tools, you are ready to get started in no time creating your next masterpiece.
https://www.thesoutherncouture.com/staging/3818/wp-content/uploads/2017/05/Boot-FI.jpg400800Bethanyhttps://www.thesoutherncouture.com/staging/3818/wp-content/uploads/2017/09/logo_freelance.pngBethany2017-05-09 05:00:372017-05-08 18:18:19What Tools and Accessories do I Need to use a Cricut and How Much do They Cost?
This shop has been compensated by Collective Bias, Inc. and its advertiser. All opinions are mine alone. I pinky promise! #LoveYourLawn #CollectiveBias
Get your yard and porch ready for Summer and warm temps with this Upcycled Pallet Turned to Outdoor Planter.
Tired of all the dreary cold and windy weather? I know I am, but happy to know that we weren’t getting snow in April like parts of the country were. If this is you, then you will absolutely this idea today to really brighten up your yard, your flower garden, or even your front porch.
SUNSHINE + COLOR= SUMMER!!!
Can we say Aqua? I am totally crushing over the bright color here lately and just can’t seem to get enough. When my husband brought this pallet home a couple years ago, I had no clue what exactly I wanted to do with it, so I just kept holding on to it.
Then when I saw these adorable metal pails when shopping recently in all their brilliant colors, it finally struck me what I was going to do with that pallet.
Grab yourself some paint and you are ready to go!
I love the way the appearance of the pallet turned out once I started painting it.
The rustic feeling with the wood still peeking through in places is just perfect. Plus, it makes painting it even easier because I don’t have to be so exact in covering it evenly.
While the pallet is drying, drill several holes into the bottom of each pail to allow water to drain when watering your flowers.
Plant your flowers in each pail by adding a little potting soil.
I used “S” hooks to hang the pails on the pallet. You could also hammer a screw in different spots and hang the pails on them. Keep reading to see how this whole thing came together in such a colorful and beautiful way.
Getting my flower garden and porch ready for Spring is just not complete without thinking of my yard too. It would be like peanut butter without jelly.
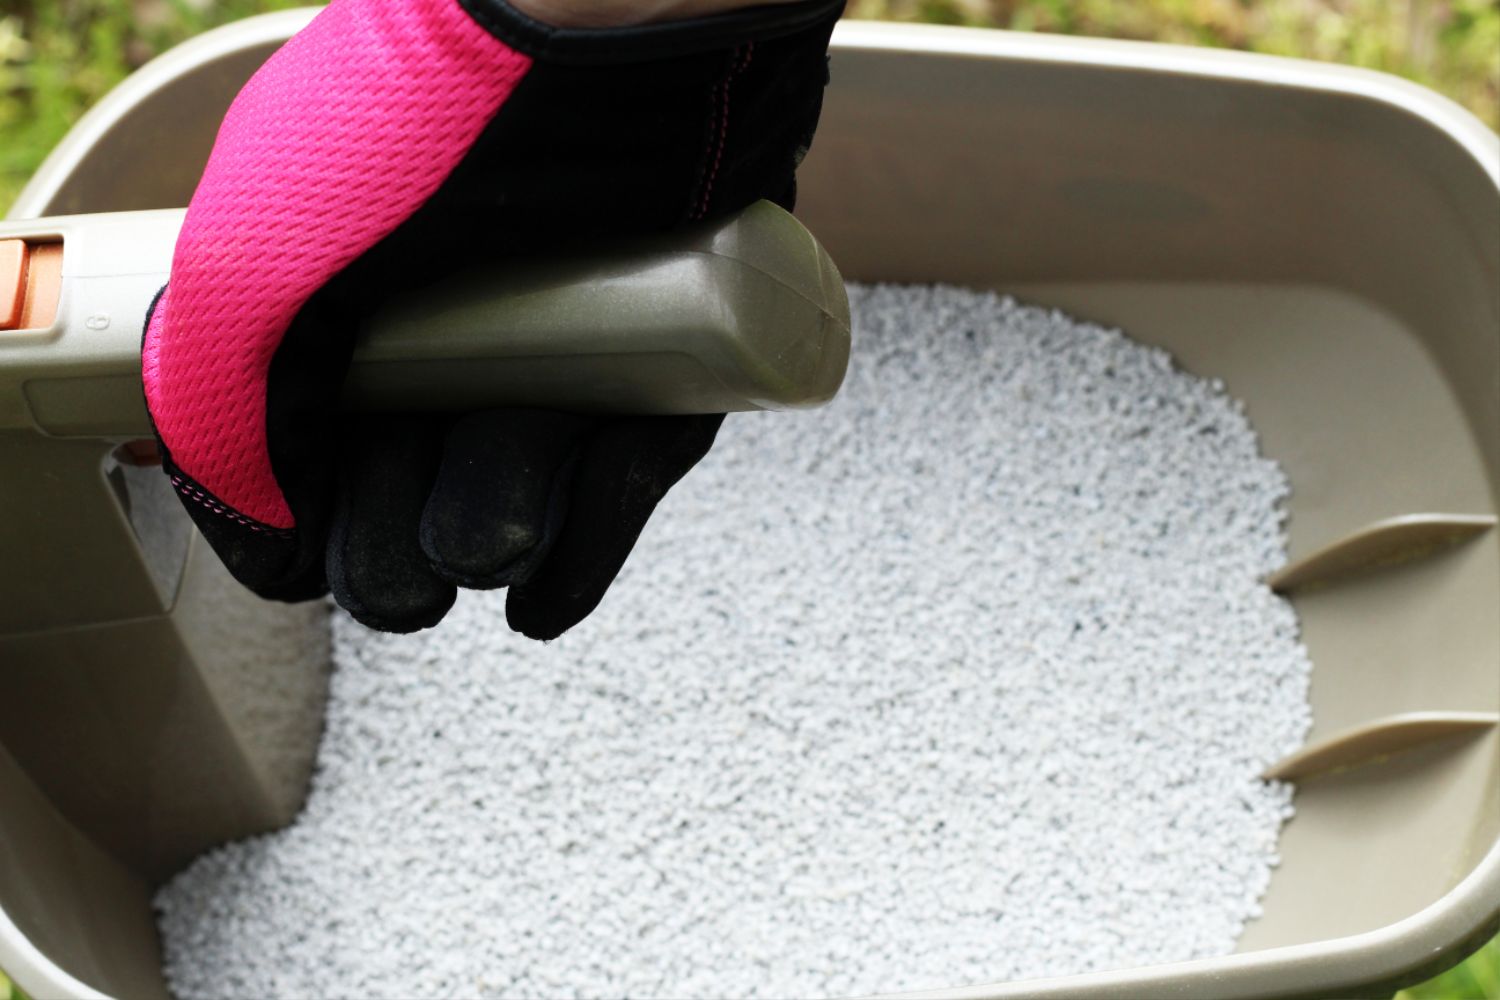
Grab your gardening gloves and get ready for the fun. And yes, I said fun with it comes to this. I can’t wait to share it with y’all too! I’m addicted and I never thought I would say that when it comes to a spreader.
We all have those places in our yard that really drive us crazy that seem bare and stubborn to grow any bit of grass. I have the answer now. That is the Scotts® Green MAX™ Lawn Food and WIZZ™ Spreader.
If you are short on time, it is full of essential nutrients for deeper greening in just 3 days. Now you can have a fresh and full green look of your lawn for all your Summer cook-outs.
The spreader is also battery-powered and perfect to use year round to weed, seed, and feed. This guy is what made my life so much better and brought me this new love.
I pressed the trigger and seed just started coming out in all directions which was amazing. It made is so easy and fun for once. It is also light weight which made it even easier.
Be sure to head to Walmart to get your lawn food and WIZZ spreader. My yard is going to thank me and my husband too.
Now for this beautiful outdoor planter…
It is an absolute beautiful feature in my flower garden and even better on my porch for a conversation piece.
Let me know in the comments below if you are planning your own cook-out this Summer and what fun projects you would love to do for your yard or porch. Find out how others are getting ready for Summer with the help of Scotts too.
Looking for specific information for how Scotts® Green MAX™ Lawn Food can help solve your lawn problems? Click here to sign up for the Scotts’ email reminder service to receive specific tips and information for your area!
Enter the sweepstakes for the chance to win Walmart gift cards and Scotts® Spreaders!
Also if you have not already, please join me on Facebook, Pinterest, Instagram, and Twitter. I would love to hear from you with any comments, suggestions, or ideas you may have.
P.S. Please share this post with others if you enjoyed it and found it helpful. We love when you pass on goodness to others.
I love being organized and knowing exactly where things are at all times. Can anyone else relate or am I the only one this crazy?
There are areas of my house that need some serious organization that I hope to be sharing with y’all soon to give you more motivation to stay organized. But today I am sharing how I am keeping my garden organized by knowing exactly what I have planted and where it is.
I have made the mistake in the past of planting tomato, different colors of bell peppers, zucchini, etc. and not marking them so I didn’t really know which plant was which. I guess I thought that I would just be able to remember in my head or could tell the difference.
Well being able to just remember wasn’t cutting it, so this year I am prepared by having my own garden markers. They are easy and quick to make. What is fun too is that you can design the markers any way you like.
First you will need to design and make a picture to fit in your frame that says what vegetable you have planted. I used Canva to design mine and then just printed them out. You could also use scrapbook paper and stickers as well.
Insert your picture into the picture frame. I used plain black 3.5″x5″ frames that I found at the dollar store. You don’t want to use anything too fancy since they will be outside.
Attach a wooden stake to the back of each frame using E6000 glue and let it sit overnight ideally to dry and stay adhered for longer.
Then when you are ready to stake them in the ground, first dig a small hole to make it easier to bury the end of the stake. This will also help to keep you from popping the frame off the stake if you are hammering it into the ground.
Place your garden marker in front of your vegetable plant and now you will know exactly what you are growing.
I love that this is such a kid friendly project as well to show them the importance of growing your own food and where vegetables come from. I remember as a child planting a garden with my parents and how much fun it was to finally see the vegetables start to grow.
Keep your garden organized with these simple markers that are homemade and personalized just the way you like.
This would also be a great gift for the garden lover in your family as well.
Don’t forget to enjoy the little things in life like your home grown veggies.
Also if you have not already, please join me on Facebook, Pinterest, Instagram, and Twitter. I would love to hear from you with any comments, suggestions, or ideas you may have.
P.S. Please share this post with others if you enjoyed it and found it helpful. We love when you pass on goodness to others.
Disclosure: This post is sponsored by Lowes, but all opinions are my own.
Some of the links in the post above are “affiliate links.” This means if you click on the link and purchase the item, I will receive an affiliate commission. Regardless, I only recommend products or services I use personally and believe will add value to my readers.
You must learn how to build a cornhole toss! Especially one that you can customize with your favorite sports team logo or your favorite colors. Your cornhole toss set will be the center of attention and a huge conversation piece at your next cook-out or party. My husband and I recently made one for our annual 4th of July cook-out and loved how we customized it too. It turned out to be such a success. We also love playing it while it’s just the two of us on a Sunday afternoon to get out of the house in the beautiful sunshine. I am sure you will feel the same way too.
I have broken everything down into detailed and easy to understand instructions with lots of pictures. First I will show you how to make the actual cornhole toss boards and then after that how to make the bean bags you will need to toss. Also so that I don’t have to be so repetitive throughout, don’t forget that what you do for one board, you will need to repeat of course on a second board. If you do have any questions, please feel free to ask. Let’s not waste any time so you can get started playing and enjoying your set just as much as we have too.
Plywood ½” thick and 2’ x 4’- Qty 2 (Be sure to match your boards up in the store before purchasing. We got our plywood home and they were not exactly cut to the same measurements. If they are off slightly it is okay. Also be sure to pick plywood that is a better quality because when you apply the polyurethane at the very end, it will really show off the wood and look amazing.)
You can also buy the bean bags already made if you would like to.
Before we get started let me remind you again that anything mentioned below to do to build a board or to add to it, be sure to also do the same for the second board or you wouldn’t end up having too much fun.
Building your cornhole boards:
First measure your 2” x 4” x 8’ wood and mark it to know where to cut.
The following is a list of the measurements of the wood pieces and how many of each you will need.
2” x 4” x 48” long-Qty 4
2” x 4” x 21” long– Qty 4
2” x 4” x 12” long– Qty 4
Cut your wood into the correct lengths where you have measured and cut using a miter saw.
You will now start building the frame by using two of the 2” x 4” x 48” and two of the 2” x 4” x 21”. The shape of the frame is a rectangle so place the shorter boards on the top and bottom and the longer boards on each side. Drill the boards together in the corners using 2 ½ wood screws. Use 2 screws per corner. I suggest also predrilling your holes before drilling the actual screw to prevent any wood from splitting. It also just makes it easier to drill the screws anyways.
Continue by drilling the other 2” x 4” x 48” and the 2” x 4” x 21” together. Drill the two sections together to form the rectangle frame.
Attach your plywood to the top of the frame with 1 ½” or 1 5/8” wood screws around the outside of the plywood into the rectangle frame.
Again predrill your holes about 6” apart and then drill the screws in. Countersink the screws, or screw below the even level with the plywood. You will fill the holes with wood filler later and then sand to cover up the screws from showing.
Building and attaching the legs:
You will now work on the legs that will hold the game up. Using a 2” x 4” x 12” wood piece that you have already cut, measure 1 ¾” from the top of one end and mark with a dot.
Then measure 1 ¾” from the side and mark.
Secure your wood piece with a c-clamp to a table to secure in place. Drill a hole with a 3/8” drill bit on the center mark you just made above.
Use a compass to draw a half circle at the top of the wood piece above the hole.
With a jig saw, saw the end of the leg off along the curved line you just drew.
The curved end of the wood will allow the legs to bend under the frame for storage. Be sure to do the above steps for the other 3 legs as well.
Place one leg on the inside of the frame and plywood with the curved end in one top corner against the side wall. Put a pen through the hole on the leg to mark the outside wood frame to know where to drill the hole on the frame.
Drill a hole with a 3/8” drill bit through the frame where the pen mark is.
Place a 3/8” carriage bolt through the hole of the frame and leg by inserting from the outside of the frame.
Add a washer and then a wing nut onto the carriage bolt on the inside of the frame.
Once secure, the leg should be able to move and fold out. If difficult to move, remove the leg and use a sander to sand down the curved edge of the leg and reattach.
Do the above steps again for the other 3 legs until all 4 legs are attached and secured in place.
Finishing touches of the Cornhole Board:
Fill in the holes on the top of the plywood from the wood screws earlier with wood filler.
Once dry, sand down for a smooth finish.
You can’t have a cornhole toss without the hole in the plywood for the bean bags. Start by measuring 9” from the top of the board on the left side. *Be sure the top of the board where you are measuring is on the same end where you attached the legs.
Then measure 12” from the left side to the center of the board and mark. This mark will be the center of the circle that you will cut out.
Place a 6” hole saw directly centered over the mark you just made and then cut the circle out which will give you perfect smooth edges. If you do not have the 6” hole saw, use a compass to draw the circle with 6” diameter and then cut it out using a jig saw. Sand the edges of the hole if needed to have a smooth finish.
Your board is now ready to be decorated. Decorate however you choose but I will explain exactly how I decorated mine for a guide.
For the white border around the edges, place painter’s tape on the outside edge lining it up with the sides. Place another strip of tape directly beside the previous tape as pictured below on the left side. Remove the outside tape as pictured on the right below. This process gives you a guide to use for a straight line when painting. Continue taping the entire border as described above.
Using a T-square/square as a guide for a straight line, place in the bottom of the left corner up to the center of the bottom of the circle and place painter’s tape. Do the same for the other side of the triangle.
Once all your tape is placed for your specific design, you are ready for the fun part of painting to give it that touch that makes it so cute. Paint the outside border and the inside of the triangle with a primer to avoid the paint soaking into the plywood and then the plywood showing through. This will also help you to avoid having to paint so many layers of paint.
Once the primer has dried, paint the outside border white with a roller. The roller will give you a more smooth finish without the bristles of a regular paintbrush showing in the paint.
Place a piece of wood under the bottom end and prop up the legs for the board to be flat to help with painting the legs and sides of the board.Paint royal blue on the sides of the board and the legs with paintbrush to cover and fill any holes in the wood. Then use a roller to paint the top coat with a smooth finish.
Paint the inside of the triangle red with a roller and then paint again with 2nd coat if needed. (The picture below shows a stencil I was going to use but later changed my mind.
Once all paint is dry, remove the painter’s tape to reveal nice crisp edges.
For my Atlanta Braves “A” or if you choose a logo, I had an 8” x 10” print of the “A” made. I cut it out and applied it to the board at the bottom of the triangle using mod podge. Paint a thin coat on the board where you want to place your image using a foam brush. Lay down the “A” and paint a coat of mod podge over the top. I repainted a 2nd coat just to be sure it was glued down well.
*When you first apply the mod podge, it will appear that it is going to dry with a white coat on top but it will dry clear. I promise. Don’t be nervous or think you ruined the whole thing because you really didn’t.
You are now ready to seal the top of the board so all your painting isn’t ruined later after lots of play time. Before applying the polyurethane, use a sponge to wipe down the board lightly to remove any dust or dirt so it doesn’t become sealed to the board as well.
Using a new paint roller, coat the top with polyurethane to seal the top and give it a shine.
As soon as the polyurethane is applied, use a different sponge to gently wipe down the top of the board to give a smooth finish with no air bubbles. My roller apparently was making some air bubbles, and the sponge really gave it a smooth coat.
Once you have also decorated the other board, your cornhole boards are now complete.
The last thing you need before playing is bean bags.
Sewing the bean bags:
Measure 8 squares on each color of duck cloth to be 7” for a total of 16 squares. Each square should be 6” on each side once finished which will happen once the bean bags are turned inside out. Then cut out the squares.
Place 2 of the squares together and sew them together with a straight stitch with a ½” border on each side around 3 complete sides and part of the 4th side. But be sure to leave enough room on the 4th side to turn the bag inside out. Double stitch as well for better reinforcement.
In order to reinforce the bag and make it sturdier, stitch around the outside of the straight stitch with a zig-zag stitch.
Cut the corners off next to make it easier to give a pointed corner once turned inside out.
Turn the bag inside out with a hole left to still fill the bag.
Once all the bags are done, you will have a total of 4 in each color for a grand total of 8 bean bags.
Using a kitchen scale, weigh about 14-15.5 ounces of dried corn or pinto beans for a total bag weight no greater than 16 ounces.
Use paper as a funnel or an actual funnel to fill each bag.
Use straight pins to close the hole and keep the beans from falling out while sewing.
Use zig-zag stitch to sew and close the hole. Double stitch for enforced durability. Remove the straight pins once the hole is sewn up.
Follow the above steps for the rest of the bean bags. Once you are finished, you are now ready to play a competitive game of cornhole. Let the games begin!!!
This was so much fun for us and our friends and family at our recent 4th of July cook-out. Mark and I have since played on numerous occasions and enjoy it so much. It’s a fun game to get the family out of the house and moving around.
I hope you choose to make your own. If you do so, please let me know and share your creation below. I love seeing other people’s creativity and what design you may have chosen for your board. Plus don’t say I didn’t warn you that this game becomes very addictive and competitive. Enjoy yourself and of course enjoy the little things in life too!
Also if you have not already, please join me on Facebook, Pinterest, Instagram, and Twitter. I would love to hear from you with any comments, suggestions, or ideas you may have.
Plus check out the picture below of my yellow lab Bryant totally photo bombing me! You can throw just about anything if it resembles a ball or a stick and he thinks it belongs to him.
https://www.thesoutherncouture.com/staging/3818/wp-content/uploads/2014/07/Featured-Image.jpg200600Bethanyhttps://www.thesoutherncouture.com/staging/3818/wp-content/uploads/2017/09/logo_freelance.pngBethany2014-07-29 23:32:262015-06-22 23:39:50How to Build a Cornhole Toss