Check out these simple but adorable craft projects inspired by Encamped Study to remember this season for years to come. Anyone can make them.
Some of the links below are “affiliate links.” This means if you click a link and purchase an item, I will receive a small affiliate commission that helps me to be able to continue with this blog and hopefully continue to inspire you as well.
Crafty time…there is nothing quite like it when I need some time for myself to just enjoy creating. Well I knew I just had to create some fun craft projects to remember my time during the Encamped Study. (Check out more about the study HERE.)
One my most favorite is this felt pennant! We have two troops for Encamped for which I am part of the Troop Sonshine. I wanted to display and show my team spirit with this pennant. I used my Cricut Maker to cut out the felt and then glued the pieces together. If you would like to make your own, CLICK HERE for the cut file in Design Space and even customize for whichever troop you are on. (If you don’t have a Cricut Maker, you could also use a pennant template and cut it out yourself.)
I don’t know if you have seen all the rave with the clay bead bracelets, but I am now obsessed with making my own. I knew I had to make one to remember this study with. Now every time I wear these, I am reminded to pray for the ladies of both Troop Sonshine and Troop Godbow. They are so simple to make and can be personalized for anyone.
To mark pages in my One Step Closer Bible with scripture that really spoke to me heart throughout the study, I made my own paperclips using the badges from the printables Leah designed. I love how they hang down on the page as a fun reminder of this time in the Encamped study. I laminated them using packing tape and just used washi tape to attach them to the paperclip.
Another simple and fun DIY is to make fabric bow clips. I got a pack of fabric at Michaels that had the perfect assortment with sunshines, rainbows, confetti, and more. These will be perfect for going in my journaling Bible.
Check out the video below to see all these crafts in more detail as I walk through how to make your very own during this special study.
Now I would love to know which one you plan on making first. Let me know in the comments below and feel free to share your creations with me on social media by tagging me. Happy Crafting and God bless!
https://www.thesoutherncouture.com/staging/3818/wp-content/uploads/2021/07/Craft-Projects-Inspired-by-Encamped-Study-FI.jpg400800Bethanyhttps://www.thesoutherncouture.com/staging/3818/wp-content/uploads/2017/09/logo_freelance.pngBethany2021-07-07 05:00:322021-07-06 21:50:54Craft Projects Inspired by Encamped Study
Check out this baby boy nursery reveal with tones of gray and white simplicity that also gives pops of natural wood. I am so excited to finally share his room with y’all and all the memories that will be made in this special room.
Some of the links below are “affiliate links.” This means if you click a link and purchase an item, I will receive a small affiliate commission that helps me to be able to continue with this blog and hopefully continue to inspire you as well.
This post has been one that I have been wanting to share for quite some time but just never seemed to get around to it. I have been having too much fun playing with my little guy I guess to sit down and take the time to share the details of his nursery. I am so excited to share a few little snippets of his room with y’all today.
One thing that was an absolute must when I found out I was pregnant was to have a nice glider/rocker/recliner. It was most definitely at the top of my shopping list. I was fortunate enough to actually have two different ones with different styles. In a separate room from his nursery is my office that also doubles as a sitting area/play area with books, toys, his activity mat. I put the glider, rocker/recliner in that area with bookshelves and lots of books. It is definitely one of my most favorite areas in the house to sit and read, nurse, or just enjoy some good family time.
In his nursery, a good friend of mine gave me another rocker with a footstool. The styles are completely different and I absolutely love that. My friend is such a sweetheart and wanted to gift us with something that we could keep for many years and have many memories with it. This one is going to be special exactly like she dreamed. Plus I love that these chairs can be used in the future in any other area in my house.
You can’t have a nursery without a crib so of course there’s that and above it is hanging this beautiful sign with a scripture that reminds me to constantly pray over my son when I see it.
Hanging beside it is a wooden “C” that I just couldn’t resist. I love how the whole room has a touch of white crispness with gray walls and also touches of rustic wood to top it all off.
For his changing table, I used a family piece of furniture that was once my grandmother’s. My mom and I painted it and added new drawer pulls making it the perfect addition to his nursery. Add a lamp to the top, a Bible, and a changing pad, and you are all set for those messy diapers. 😉
I really wanted to keep his room simple so that it could be something that we could change and redecorate easily as he gets older without having to repaint and buy all new decor every few years. I’m also loving this pennant from Dayspring that they were so gracious to send Baby Boy.
The quote is such a great reminder and ties in perfectly with the same theme from the hanging framed scripture. It is perfect hanging in a window or even on his door instead of a wreath. Plus how adorable is that little hanging pom pom. These little types of decorations are such sweet reminders of what God wants for us every day. My prayer is that my son will grow up knowing that his Heavenly Father loves him and only wants the best for him.
If you absolutely adore this pennant as much as I do, then make sure to check out Dayspring right now to grab one for your home and even for a new mom perhaps. They also have different sizes, colors, and styles. And yes, there is pink too for the baby girls. AND, make sure you use the coupon code THANKYOU at checkout for 25% off your entire order. But that’s only through July so don’t forget and happy shopping.
Thanks for taking this little room tour with me! Hopefully this simple but yet classy decor will give you a few ideas for some touches to your child’s room.
Kick off the next school year with a back to school themed wreath using school supplies that is perfect for a homework station or as a gift to your child’s new teacher this year.
Some of the links below are “affiliate links.” This means if you click a link and purchase an item, I will receive a small affiliate commission that helps me to be able to continue with this blog and hopefully continue to inspire you as well.
I can’t believe I am even about to say this, but it really will be back to school time before we even know it. NO!!!! Summer days are just too much fun with all the sunshine, vacations, lounging poolside, and more. But it’s coming whether we like it or not which is why I am just going to embrace it at this point and create a back to school themed wreath.
What a precious idea to use to decorate a homework station, maybe like this one, or a study/desk area in your child’s room. It’s even great to give as a gift to your child’s new teacher to decorate their classroom door with. I even used school supplies for most of the materials which you can find very inexpensive this time of year. *Now stay tuned because below I have even more wreath ideas from several friends of mine as part of 12 Months of Wreaths.
First your paper should be folded vertically twice until it is only about 2″ wide as shown in image above. Wrap the paper around the wreath and secure in place using a floral pin. *You could also hot glue the paper in place, but the pins make it so much easier and faster.
Hot glue the crayons to the bottom of the wreath using as many crayons as you prefer.
Hot glue the scrabble pieces to spell “ABC” or any other phrase you like.
Hang ribbon at the middle of the wreath as a banner and place under the floral pins on the back to secure in place.
Write a phrase on the miniature chalkboard using the chalk marker and attach to the back of the wreath under a floral pin.
Wrap ribbon around the top of the wreath for more color and decoration. Tie one piece of ribbon longer to allow for space to hang the wreath.
And that’s all there is to it. This is definitely a project that your kids could join in on with a little help and make together.
Even if we dread the school year, we mine as well embrace it and enjoy every minute that we can. (At least that’s what I’m telling myself so I don’t cry. 😉 )
Now for even more…several of my friends are also sharing their wreath ideas as part of 12 Months of Wreaths. Be sure to check out their loveliness below and follow their blogs as well.
Thanks again for joining us! We will be sharing a new wreath once a month in 2017! Are you interested in sharing a wreath with us one (or more) months? We are accepting guest hosts! Email carrie (at) curlycraftymom (dot) com if you are interested! SaveSave
https://www.thesoutherncouture.com/staging/3818/wp-content/uploads/2017/07/Back-to-School-Themed-Wreath-using-School-Supplies-FI.jpg400800Bethanyhttps://www.thesoutherncouture.com/staging/3818/wp-content/uploads/2017/09/logo_freelance.pngBethany2017-07-25 05:00:342017-07-24 14:22:56Back to School Themed Wreath using School Supplies
Check out this comparison of letter boards from different brands to see the features of each one and how they differ in making a decision on which to purchase.
I’m sure you have seen the big craze with letter boards recently that seems to be blowing up on everyone’s Instagram and social media posts. I love seeing all the clever sayings that people come up with to make you smile. I can’t wait to share mine in the near future now that I have my very own letter boards.
I recently saw that Walmart had them and couldn’t believe it. Some of them are so expensive, so I couldn’t wait until they were finally available in my store. I ended up seeing a little different style of one in Joann and couldn’t resist since I had a coupon to use for it.
That’s when I decided that I would share them both with y’all in a video so you could see them up close and personal but also side by side. I share the good and bad with both and what I like about each one. Check out the video below to see it all and subscribe to my YouTube channel while you’re there if you would like to see more goodies like this one.
There are definitely differences between the two with both having great qualities. Which one would you rather have? What do you like best? Any good phrases or quotes I could use on mine? Leave them below in the comments for me. I would love to hear them.
https://www.thesoutherncouture.com/staging/3818/wp-content/uploads/2017/07/Comparison-of-Letter-Boards-from-Different-Brands-FI.jpg400800Bethanyhttps://www.thesoutherncouture.com/staging/3818/wp-content/uploads/2017/09/logo_freelance.pngBethany2017-07-15 05:00:502017-07-14 23:15:20Comparison of Letter Boards from Different Brands
Learn how to make the easiest faux succulent and moss wreath with one tool that makes everything come together in less than 30 minutes.
This post is sponsored by FloraCraft. All opinions are mine alone. I pinky promise! Some of the links below are “affiliate links.” This means if you click a link and purchase an item, I will receive a small affiliate commission that helps me to be able to continue with this blog and hopefully continue to inspire you as well.
One thing that I am absolutely dreamy about are succulents. Who isn’t these days? The great news is that if you think you have a black thumb, then this craft will still be perfect for you. How about FAUX succulents that are still just as stunning?!
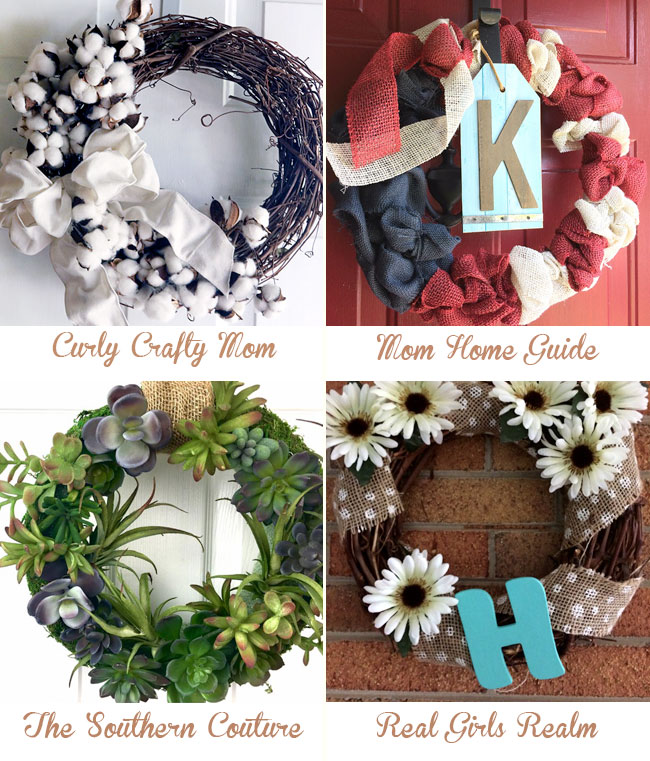
With a touch of moss and a variety of different succulents, you can have the most gorgeous wreath to hang anywhere you like too! I’m celebrating the 12 Months of Wreaths series today with this beauty, but keep reading for several other fun wreath ideas from several friends of mine.
These succulents along with the other items I’m using for this faux succulent and moss wreath are from FloraCraft. I have enjoyed using their products on a couple of past projects and couldn’t wait to create something fun with their succulents. They come in so many different colors and varieties. You will just love them!
First, wrap the moss around the outside of the wreath using hot glue as needed. Place the overlap, if any, on the top side where the succulents will be placed and attach to the wreath using floral pins. These floral pins are what makes this project so easy. You can attach just about anything in no time. I love them!
Next, start laying out your succulents and placing them as desired. I poked them straight into the styrofoam wreath. You don’t have to worry about covering the inside of the wreath with moss because your succulents should hide any of the foam.
Then, measure and wrap a piece of burlap ribbon around the top of the wreath and tie in a knot. You can now hang your wreath and enjoy all that gorgeous nature.
I really can’t get enough of this one and can’t believe I didn’t make one already. I have no clue what I was waiting for!
But now let’s see what wreaths my friends have made for y’all so you can get even more ideas…
Thanks again for joining us! We will be sharing a new wreath once a month in 2017 so be sure to come back again next month for more creative ideas! Are you interested in sharing a wreath with us one (or more) months? We are accepting guest hosts! Email carrie (at) curlycraftymom (dot) com if you are interested!
Sounds like you have plenty of wreath ideas for your next craft night. I would love to know which one you choose to make. Please feel free to share or even share one of your own wreath ideas in the comments below. Enjoy! And the greatest of these is love,
https://www.thesoutherncouture.com/staging/3818/wp-content/uploads/2017/05/How-to-Make-the-Easiest-Faux-Succulent-and-Moss-Wreath-FI.jpg400800Bethanyhttps://www.thesoutherncouture.com/staging/3818/wp-content/uploads/2017/09/logo_freelance.pngBethany2017-05-23 05:00:322017-05-22 07:53:35How to Make the Easiest Faux Succulent and Moss Wreath
Remember Mom this Mother’s Day with a heart shaped photo wreath that displays all the fun memories you had together.
Some of the links below are “affiliate links.” This means if you click a link and purchase an item, I will receive a small affiliate commission that helps me to be able to continue with this blog and hopefully continue to inspire you as well.
With this digital age that we live in, it can be very easy to have a million pictures stored on our phone or cameras. But let’s be honest. How many of those images do we ever actually print and display or even store them in an album for others to see? Very few I’m sure! Today we are changing that!
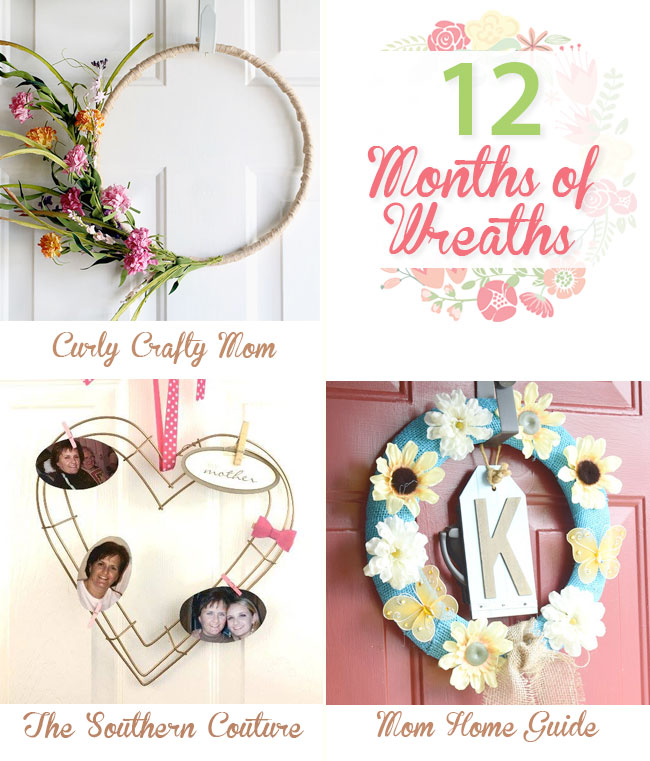
Start printing pictures now, specifically those of you and your Mom, for this wreath idea. I’m back again for another wreath idea for this month’s 12 Months of Wreaths Challenge. My friends are also sharing their DIY wreath ideas so stick around for that too. You will find them below.
This wreath will be a perfect DIY gift idea for your own Mom, but also great to hang on your own inside door to remember your Mom and all the memories you share together. You might even want to have a craft night and make one together. It is so simple and easy to put together too.
While the wreath is drying, trim down your photographs if needed so they aren’t too large for the wreath depending on the size you use.
Start playing around with the placement of your photo prints. Attach them to your wreath using miniature clothespins.
Display your wreath with all your fun memories and celebrate your Mom. Now you can enjoy them and be reminded of all those good times instead of them being packed away. Plus this would be a great DIY Mother’s Day gift for your own Mom to remind her of all the good times and memories you made together.
Now for the other wreath ideas and this month’s challenge.
Thanks again for joining us! We will be sharing a new wreath once a month in 2017! Are you interested in sharing a wreath with us one (or more) months? We are accepting guest hosts! Email carrie (at) curlycraftymom (dot) com if you are interested!
Happy Early Mother’s Day too! And the greatest of these is love,
https://www.thesoutherncouture.com/staging/3818/wp-content/uploads/2017/04/FI.jpg400800Bethanyhttps://www.thesoutherncouture.com/staging/3818/wp-content/uploads/2017/09/logo_freelance.pngBethany2017-04-18 05:00:462017-04-15 22:10:16Remember Mom this Mother’s Day with a Heart Shaped Photo Wreath
Open a whole new window of opportunity in your crafting world by learning how to use iron-on vinyl with Cricut Explore Air 2.
Do you ever walk through your favorite store or mall and see those adorable shirts with the hand lettered quotes and designs? I see them all the time now with handlettering becoming so popular and wish I could buy all of them. But let’s be honest. My budget will just not allow for it and neither will the lack of space in my closet due to all the other stuff.
Well here’s the fun part of this whole “catastrophe.” You don’t have to worry about walking away from that gorgeous shirt you just think you can’t live without because now you can make your own!! Thanks to the Cricut Explore Air 2! (Remember me mentioning it last week in THIS post. Well we are back for Part 2 of this series.)
The Cricut Explore Air 2 can cut just about any material you can think of. One of those is Iron-On Vinyl which means your budget can now afford to have those beautiful shirts plus anything else you can think of that you want to personalize.
How to Use Iron-On Vinyl with Cricut Explore Air 2
Now don’t feel intimidated or worried that this is difficult or think you will ruin all your clothes in the process. With a few tips and tricks, you will be starting in no time. You don’t even have to come up with your own design. With the Cricut Design Space software, you can pick a ready-to-make project and have your project finished in no time. Below is what the design space looks like when you first open it.
Below is also the apron I made so you can see the finished project, but keep reading for more detailed instructions.
I searched under the Fashion category to see what projects were there because I knew I really wanted to use the iron-on vinyl. I came across this apron that read “Hangry” with the definition below. Anyone that knows me knows that Hangry is basically my middle name. I have been like this from birth so it’s not really my fault, right? 😉
Once I clicked on the project, a list of supplies that I would need along with simple instructions to complete the project were right there at my fingertips. None of us can use the excuse that we just aren’t creative enough because Cricut has taken care of the hard part for us with their ready-to-make projects.
The apron originally showed up on the cutting mat in the software as a lighter grey or white. My apron I used is black so I wanted to change the color so it would appear more realistic of my final project.
#1 Look on the right side of the screen and click Canvas. You can then choose the type and size of your apron. This is especially helpful to make sure your vinyl cut isn’t too large at the end.
#2 Change the color of the apron if needed.
You notice above the lettering was black automatically therefore I needed to change the font to the color of the iron-on vinyl.
#1 Click on Layers.
#2 Click on the white box for the layer you are working on. For this project there is only one layer so I clicked the white box below welded image.
#3 Click the color of the iron-on vinyl you are using.
If you are happy with the way everything looks, then you are ready to save. Once you click save, you will see a screen to name your project. After you have saved, click the little green Cricut logo at the top that says “Go” and you will next see a preview screen of the cutting mat.
On the left, you will see the cutting settings.
#1 Make sure you have the correct mat size chosen. Be sure to click the small box to choose “mirror image” due to using the iron-on vinyl or your final project will be backwards.
#2 Before pressing Go, make sure to load your material on the mat as the font is being shown on the preview mat. Place the liner side down when using iron-on vinyl. The machine makes a “kiss cut” because iron-on has a clear backing on it that allows you to transfer the cut to your apron. Then press Go to get started.
The next screen shows the setting that the actual Cricut machine is set too.
Be sure to change the dial setting on the machine for the material you are using. Your material should already be adhered to the mat.
You will see the flashing double arrow button on the machine waiting for you to load. Place the mat into the machine under the side grooves and press the arrow button. The machine will then pull the mat inside and wait for you to press the final Go button.
The machine will recognize the mat is loaded and then the Cricut logo button on the machine will start flashing. Push that button and now you just let the machine do the cutting.
While the machine cuts, you will see to the left on the screen I progress bar and also in the middle of the screen telling you the cut is in progress. Once the cut is complete press the flashing arrow button again to unload the mat, and you are ready to remove the vinyl.
Remove the negative, or unused, vinyl from the mat leaving the font still adhered.
Cricut has a weeding tool that helps to get the small pieces of vinyl when there are more intricate cuts. Underneath the vinyl on the mat, you will notice a clear film after removing all negative vinyl. This is what you get with a “kiss cut” so you can transfer the vinyl easily. Remove the liner with the vinyl attached and set aside.
Set your iron to the cotton or linen setting which is usually the hottest setting and turn off the steam function if possible. Use your iron to preheat the area you will be placing the vinyl to for about 15 seconds.
Place the weeded image to the apron with the liner side up. You should be able to read the lettering. Cover the image with a light dish towel and iron over the towel where the vinyl is below for about 30 seconds with medium pressure.
Then flip the material over and iron with medium pressure for another 30 seconds. You do not have to use the dish towel for the back. Do not leave the heat for too long or you will start to see the vinyl melting.
Let the material cool and then remove the film. This is the best part for me as I hold my breath each time in amazement at how easy the vinyl adheres and the film is removed.
Now you get the fun part of wearing the apron of shirt you have made without worrying about breaking the bank or your budget in the process. You will even be amazed at the compliments you of people wanting to know where they can one of their own. What they need to know is that they need a Cricut too and have been missing out.
Let me know what project you have in mind to get started on right away. Be sure to check out the Cricut Design Space software for ideas. If you have more questions about the Cricut Explore Air 2, be sure to check out week 1 of this series from last week with all the details. Stay tuned for next week where I’ll be sharing how you can upload your own designs and images to use in the software. (There may just be a free printable for your Bible journaling or planners too ;).)
Some of the links in the post above are “affiliate links.” This means if you click on the link and purchase the item, I will receive an affiliate commission. Regardless, I only recommend products or services I use personally and believe will add value to my readers.
This is a sponsored conversation written by me on behalf of Cricut. The opinions and text are all mine.
https://www.thesoutherncouture.com/staging/3818/wp-content/uploads/2017/03/How-to-Use-Iron-On-Vinyl-with-Cricut-Explore-Air-2-FI.jpg400800Bethanyhttps://www.thesoutherncouture.com/staging/3818/wp-content/uploads/2017/09/logo_freelance.pngBethany2017-03-22 05:00:412017-03-22 07:40:40How to Use Iron-On Vinyl with Cricut Explore Air 2
Dress up any door of your house with this baby carrot wreath tutorial for Spring made from upcycled empty spools of thread.
Every once in a while, I think it’s fun to challenge ourselves to do something new and different. For this 12 Months of Wreath idea, I wanted to make this Baby Carrot Wreath Tutorial for Spring out of supplies that I already had and really challenge myself.
When I started browsing through my craft room, I really wasn’t sure and had no clue I would end up with lots of baby carrots. But now here we are, and I just love it. I love that every supply that was used for this wreath was something I already had on hand and put to good use. There is something about the joy of being thrifty!
Baby Carrot Wreath Tutorial for Spring
You will never believe where the supplies to make the baby carrots came from. Check out this bag below.
My grandmother is always sewing and ends up with tons of these empty spools that once held tons of thread. I have been hanging on to them not knowing exactly what I would use them for.
*You will also see floral wire pictured, but I ended up not using it.
The 2 larger carrots hanging in the middle were made from a craft I did a couple of years ago. You can find that tutorial HERE.
If you do not know anyone that sews, try checking at thrift stores or local alterations stores or seamstress who would be more than glad for you to take them off their hands. You can also buy wooden ones at craft stores and online.
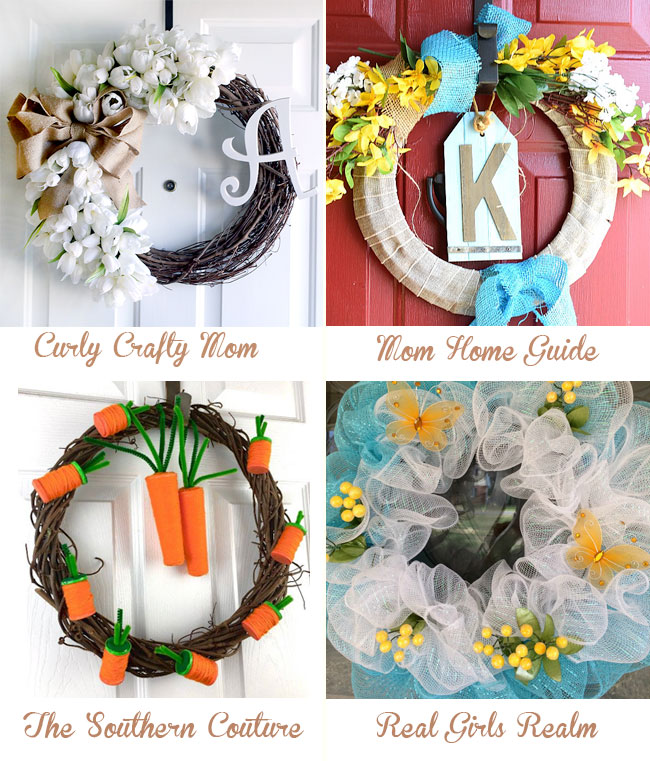
First paint one end of each spool orange and the other end green. It is just much easier this way then having to wrap the yarn on the ends.
Cut out small circles of orange and green felt. You can go ahead and measure and cut your green pipe cleaners as well.
Glue the felt circles to the corresponding ends of the spools.
Cut a tiny slit through the middle of the green felt circles and push the pipe cleaners through the center of the spool.
Start wrapping the orange yarn around each spool until you have it completely covered and as thick as you like. Glue the end of the yarn to the spool.
Attach the 2 large carrots in the middle of the wreath at the top using the green pipe cleaners that are in the center of the spool. The pipe cleaners can just be wrapped easily around one of the branches and secured.
Place your baby carrots around the wreath and then glue down with a hot glue gun once you have the placement right.
After all your carrots are attached, you can now hang your wreath and enjoy all Spring and Easter.
This wreath is one that I will be hanging on an inside door and enjoying for years to come. Plus I love looking at it and knowing that I don’t always have to run out to the store for craft supplies for every project.
Now before you go to make your own, be sure to check out my friend’s below and their wreath tutorials. Every door in your house will thank you. And then come back next month for more wreath ideas to keep you going every season this year.
Thanks again for joining us! We will be sharing a new wreath once a month in 2017! Be sure to stop by all of the hosts and our co-host, Mary at Real Girls Realm to see what wreath we came up with for the month! Are you interested in sharing a wreath with us one (or more) months? We are accepting guest hosts! Email carrie (at) curlycraftymom (dot) com if you are interested!
Chances are you already have most of these supplies on hand too and can get started now. Enjoy and Happy Easter!!
Some of the links in the post above are “affiliate links.” This means if you click on the link and purchase the item, I will receive an affiliate commission. Regardless, I only recommend products or services I use personally and believe will add value to my readers.
https://www.thesoutherncouture.com/staging/3818/wp-content/uploads/2017/03/Baby-Carrot-Wreath-Tutorial-for-Spring-FI.jpg400800Bethanyhttps://www.thesoutherncouture.com/staging/3818/wp-content/uploads/2017/09/logo_freelance.pngBethany2017-03-21 05:00:562017-03-18 20:37:29Baby Carrot Wreath Tutorial for Spring
Get to know the Cricut Explore Air 2, the one crafting tool that will change your life with endless possibilities and crafts.
If you are here reading this, then you would probably agree with me that you love one of the following categories: DIY & Crafts, Bible Journaling, Planners, Party Planning & Decorating, Papercrafting, etc. Would you believe me if I told you that you could buy ONE, only one, craft tool that you could use for all these categories and even more?
YES, it is true! That’s exactly why I love the Cricut Explore Air 2 so much. Besides all the awesome features that I will explain more below, this machine can be used for just about any DIY & craft project that you can think of. Talk about life-changing!
When I find something that has been super helpful and enjoyable for me, I love being able to share with you too so that hopefully you can find the same joy I do in creating beautiful things. Then you can only imagine my excitement when this mint beauty showed up on my doorsteps. The style, color, and design are just so chic and gorgeous.
Now what exactly is a Cricut Explore Air 2? Cricut refers to it as a DIY speed machine which I thought was so clever. It is a smart cutting machine that will cut and write giving you the option to make projects with over 100 different materials. Below are some of the highlights and features of this incredible tool (Credit: Cricut.com):
The most precise cutting, writing, and scoring technology
Cuts 100+ materials
Easily design your project on PC, tablet, or smartphone
60,000+ project and design ideas to kick-start any project
Double tool holder for one-click cutting and writing
Works wirelessly via Bluetooth®
UP TO 2 TIMES FASTER CUTTING AND WRITING
They have different mats to use depending on the material you are using and how much “stickiness” you are going to need for the material to adhere.
Their range of supplies also makes working with different material and even tedious cuts a breeze.
The machine also comes with a Smart Set dial to adjust depending on the material you are using. Then the machine adjust the pressure and speed appropriately.
If you aren’t feeling quite so creative and worry about trying to come up with your own project, then have no fear because Cricut has that covered too. You can use their software, Cricut Design Space, to choose from tons of projects that have already been designed and are just waiting for you to get started.
One feature that I just absolutely love is the “print then cut” feature. I use printables for Bible journaling all the time. The hard part though is making intricate cuts myself with just scissors on more detailed printables. This machine takes care of that hard work for me now. I cannot wait to utilize this feature even more now and take advantage of printables for not only my journaling Bible but also in my planner.
Ever seen those gorgeous handmade cards and envelopes and wondered how people do it? Well you can too because there is also a scoring stylus that makes cardmaking a breeze. You will get to impress everyone else now too.
Perhaps an adorable shirt design is also in my near future using the Cricut Iron-on Vinyl. You will have to keep following along to see and hopefully make one with me. We can be twinsies!
I have some fun projects planned and can’t wait to share more of what is to come in the near future using my Cricut Explore Air 2 with all of you. This is actually the first post of a mini series where I will be sharing how to get started with a ready-to-make project of your own and also making a project from scratch using the Cricut Design Space. Next week will include Part 2 so don’t miss that!
If you are interested in a machine of your own and want to join this journey along with me, then be sure to CLICK HERE to find out more details and get to shopping right away!
If you already have a machine, let me know in the comments below what your favorite material to work with is. I can’t wait to try out some leather too!
Happy Crafting!
This is a sponsored conversation written by me on behalf of Cricut. The opinions and text are all mine.
Some of the links in the post above are “affiliate links.” This means if you click on the link and purchase the item, I will receive an affiliate commission. Regardless, I only recommend products or services I use personally and believe will add value to my readers.
https://www.thesoutherncouture.com/staging/3818/wp-content/uploads/2017/03/Get-to-Know-the-Cricut-Explore-Air-2-FI.jpg400800Bethanyhttps://www.thesoutherncouture.com/staging/3818/wp-content/uploads/2017/09/logo_freelance.pngBethany2017-03-15 05:00:302017-03-22 09:39:57Get to Know the Cricut Explore Air 2
Learn how to make the most versatile wreath for any season with just a few supplies and an easy tip that only takes a few minutes to complete.
We all want our front door to have the most beautiful curb appeal all year long but having to change your wreath every month or every holiday can become expensive and time consuming. For this second month of 12 months of wreaths, I have the simplest idea to make the most versatile wreath for any occasion with only one simple change.
*Make sure to keep reading too to see more wreath ideas from my good friends.
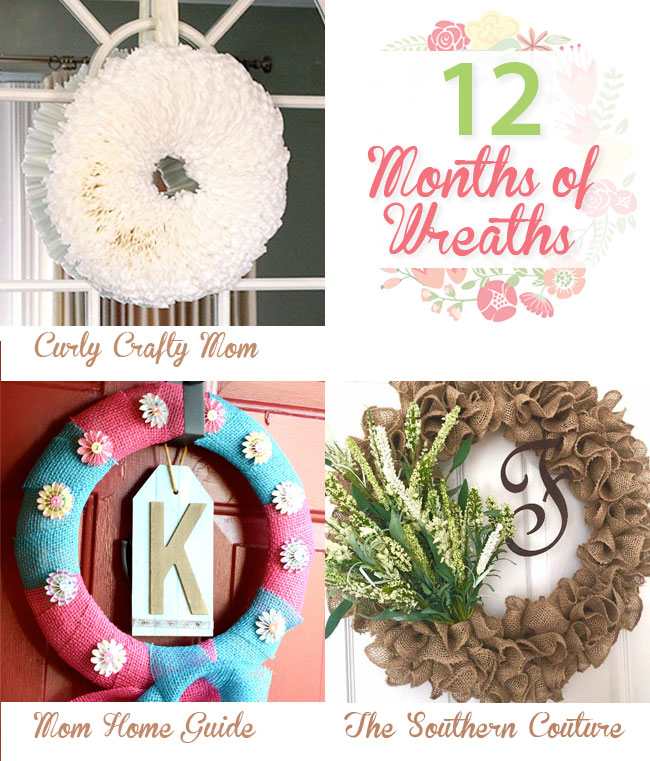
First you need a burlap wreath. I found mine at Michaels already made and even on sale. I couldn’t buy the supplies for the price I paid for the wreath. Plus it made my life much simpler. And they aren’t paying me to say any of this. It was just so convenient. If you can’t find one already made, there are lots of tutorials out there to help ya out.
Grab a few floral picks or floral bundle like this one I found at Michaels as well. Attach it to the wire frame on the front and back by wrapping floral wire around the bundle and tightening the wire on the back.
Attach the wooden letter in the same way fastening the floral wire to the metal frame.
The burlap makes it easy to hide the bottom of the floral bundle or picks by wrapping the burlap around them.
The burlap can also be wrapped around the floral wire from the wooden letter to disguise it some.
Hang your wreath and fluff the floral picks to keep them from getting flat.
All you have to do is stand back and enjoy a simple wreath that takes less than 10 minutes to put together.
Now for the secret tip that is life changing for all us wreath lovers…Are you ready for it?
Change out the floral picks!!
Yes, that’s it. Sometimes the simplest ideas are the biggest and most helpful even when they aren’t that obvious. Now you just need different floral picks or small decorations for each season or holiday and you can use this same wreath all year long.
Now for February’s edition of 12 Months of Wreaths…
Lauren at Mom Home Guide Blog | Facebook | Pinterest | Instagram | Twitter | Bloglovin’ Bethany at The Southern Couture Blog | Facebook | Pinterest | Instagram | Twitter | Google+ | Bloglovin’ Thanks again for joining us! We will be sharing a new wreath once a month in 2017! Be sure to stop by all of the hosts to see what wreath we came up with for the month! Are you interested in sharing a wreath with us one (or more) months? We are accepting guest hosts! Email carrie (at) curlycraftymom (dot) com if you are interested!
Some of the links in the post above are “affiliate links.” This means if you click on the link and purchase the item, I will receive an affiliate commission. Regardless, I only recommend products or services I use personally and believe will add value to my readers.
https://www.thesoutherncouture.com/staging/3818/wp-content/uploads/2017/02/Wreath-FI.jpg400800Bethanyhttps://www.thesoutherncouture.com/staging/3818/wp-content/uploads/2017/09/logo_freelance.pngBethany2017-02-21 05:00:132017-02-20 17:24:08How to Make the Most Versatile Wreath for any Season