Give your Mom a gift that will not only be gorgeous but also sentimental with the Mother’s Day gift idea plus free printable gift tag.
This post is sponsored by Dayspring. All opinions are mine alone. I pinky promise! Some of the links below are “affiliate links.” This means if you click a link and purchase an item, I will receive a small affiliate commission that helps me to be able to continue with this blog and hopefully continue to inspire you as well.
What a special time of year it is to celebrate and remember the Moms in our lives and all those that have been a motherly figure to us too. At the same time, I realize that many of you may be more emotional with this day if your Mom is no longer with us. Please know that I don’t take that lightly, and each of you are in my prayers.
Even if your Mom has passed, this gift idea would also be perfect for you to remember her by or even to give to a sister. I love gifts that are not only gorgeous but also just as sentimental with so much thought.
This necklace is the Sweet Peas in a Pod Pewter Pendant from Dayspring with each freshwater pearl representing one child. Talk about thoughtful and stunning at the same time?! I fell in love with it right away and knew I had to get one for my own Mom. The necklace comes with one “pea” all the way to four “peas” depending on the number of children.
Make sure you head over to check this one out and more of their jewelry just in time for Mother’s Day because they are having a jewelry sale for a limited time until 5/1/17. Some pieces will be up to 70% off!
Plus what I love about this necklace is also the packaging it comes in. The jewelry box has a beautiful foiled logo of the brand as well. Then you just need some white gift wrap, a colorful ribbon, and my printable gift tags.
I made two different ones with the floral and colorful pattern and then just a simple black and white depending on your Mom’s style and taste.
I attached my label to the top of the gift box, and now I’m all ready to go thanks to Dayspring and their jewelry sale. I can’t wait to see what my Mom thinks of this one. I know she will love it and yours will too!
Happy Mother’s Day to all the beautiful women in this world! And the greatest of these is love,
https://www.thesoutherncouture.com/staging/3818/wp-content/uploads/2017/04/Mothers-Day-Gift-Idea-Plus-Free-Printable-Gift-Tag-FI.jpg400800Bethanyhttps://www.thesoutherncouture.com/staging/3818/wp-content/uploads/2017/09/logo_freelance.pngBethany2017-04-28 05:00:592017-04-27 21:39:37Mother’s Day Gift Idea Plus Free Printable Gift Tag
Surprise someone special to you with this Non-Traditional Easter Basket Idea for Bible Journaling Fans. The organization bags doubles as the Easter basket.
A HUGE thank you to Dayspring for sponsoring this post and encouraging all of us to pursue and strengthen our relationship with Jesus Christ. Some of the links below are “affiliate links.” This means if you click a link and purchase an item, I will receive a small affiliate commission that helps me to be able to continue with this blog and hopefully continue to inspire you as well.
Here comes Peter Cottontail, hopping down the bunny trail… Song in your head now? It happens to be the cutest little song that brings back memories from my childhood singing it with my Mom and Sister. Peter Cottontail means though that Easter is definitely on its way!
We all know that I am a huge Bible journaling fan obviously and chances are you are too if you are reading this. Or perhaps you know someone who is and are looking for a few ideas for Easter. You have come to the right place. (Plus you can share this post with a husband who might need a good hint for an Easter basket for you too.)
The image above shows the whole “basket” put together, but I want to walk you through each part and also give you a few tips for making an Easter basket really gorgeous. Now an Easter basket isn’t much without the actual basket. I decided to put a spin on the traditional basket and use something that will also be extremely practical while adorable at the same time.
This is the spankin’ brand new Illustrated Faith organization bag that you can also get a matching kangaroo pouch to go along with it. This bag is perfect for on-the-go, workshops, small groups, traveling, or just moving around your house to journal.
This bag seriously holds a ton of stuff. I couldn’t believe how much I put in mine without it even feeling bulky or awkward. Talk about pockets and pouches. It definitely has those too. Plus I can store my journaling Bible right inside without any problems. The sides have zippers making it easy to open and find anything inside. One side has 2 mesh pockets with a large button pocket behind those. The other side has these 2 clear pouches to hold smaller objects like papercuts and washi tape. Not enough pockets and storage yet? Well you have 2 more pockets on the sides of the bag as well.
You might have seen that beauty of a Bible just sitting there looking fabulous in all its floral goodness. This is the Journal the Word Bible in the Floral design from Dayspring. That cover is just stunning with the pops of coral and aqua. It is the King James Version and has lined, 2″ margins. I’m in love for sure!
Now that you have your “basket” and journaling Bible, your friend or loved one is going to need some pretty cool supplies to fill it up with. When I want stickers and craft supplies to use in my own Bible, I always look at Illustrated Faith’s stuff from Dayspring first. They never disappoint. Talk about the cute factor. Below are a few basic supplies that are great for beginners to really get them started. Below are Books of the Bible tabs, Hexie epoxy stickers, Homespun Alphabet clear stamps, Tape runner, and Washi tape with several quotes of scripture.
I also splurged and included the Illustrated Faith Watercolor set that also comes with a paintbrush and the tin case to use to mix colors. Every page needs a little pop of something to help it stand out which is where these Pom Pom clips come in to play. I love all the different colors too. You can find all these products and more at Dayspring to get their basket filled and get them on their own Bible journaling adventure.
Now let’s put this all together and add a few simple touches to really make it pop. There a few ways you could go about doing this. You can pack the supplies in all the pouches and surprise them that way when they open it. OR you could put it all on display with some Easter grass and tissue paper like I did.
I stood the journaling Bible up in the middle and made sure the bag was completely zipped on both sides. Then I just started arranging all the different supplies with the taller items in the back. Make sure you throw some sweets and goodies in there too. I added some “Bunny Cotton Tails” cotton candy and a chocolate cross and chocolate Easter eggs. After all, it is an Easter basket and they will need something sweet to snack on after all their journaling work.
I also kept the matching kangaroo pouch out separate and added more smaller supplies to it. Add some Easter grass and tissue paper to the pouch and “basket” to fill in any spaces and also add pops of color.
They will also love this tag that hangs for them to put a name card in or an inspirational quote on the backside. The scripture at the bottom is also a favorite and a great place for them to start with an entry in their new Bible.
You are truly going to make someone’s day with this Bible journaling Easter basket. Plus think about the seed you will be planting as they start their Bible journaling adventure. I know that lives will be touched even with the smallest of gestures. Plus treat yourself this Easter and grab one for you too. I am in love with mine and again so shocked at how much it will hold.
https://www.thesoutherncouture.com/staging/3818/wp-content/uploads/2017/03/Non-Traditional-Easter-Basket-Idea-for-Bible-Journaing-Fans-FI-2.jpg400800Bethanyhttps://www.thesoutherncouture.com/staging/3818/wp-content/uploads/2017/09/logo_freelance.pngBethany2017-04-03 05:00:472017-04-04 00:32:12Non-Traditional Easter Basket Idea for Bible Journaling Fans
This Valentine’s Wreath using Embroidery Hoop and Pom Pom Garland is simple to make and charming to hang on your front door or even an inside door.
The beloved February 14, day of love or whatever you want to call it, is soon upon us. I just love having a reason to celebrate any holiday with some kind of sweet craft that is simple but also just as charming. This Valentine’s wreath I made recently has got to be one of my favorites so far.
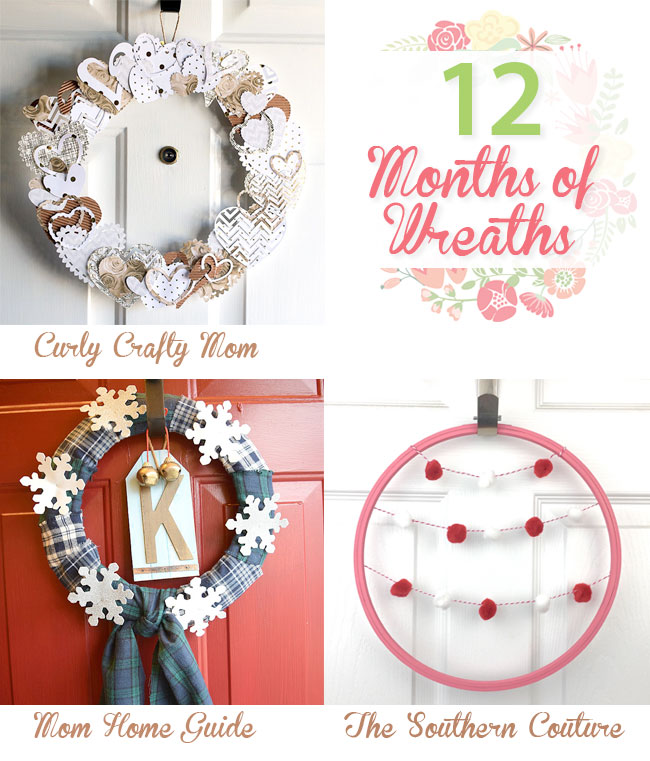
Before we get started though, I have some fun news to announce in the name of “Wreaths.” Every month this year, you will be able to get a brand new wreath idea right here to keep your front door decorated for any and every season. And if that isn’t enough, I have 2 other sweet friends that are sharing their wreath ideas every month too. Keep reading to check those out below. You now have no excuse for a blank and empty door.
This wreath doesn’t require a ton of supplies, doesn’t cost a ton of money, and doesn’t take a ton of time to make. It really is one of those crafts that you can just sit and put on your favorite show and enjoy some time creating. Now let’s have a ton of fun! Tired of the word “ton” yet? 😉
Valentine’s Wreath using Embroidery Hoop and Pom Pom Garland
Spread out scrape paper or newspaper before you start painting. Paint the embroidery hoop wreath. I used a bright pink paint and love the pop of color. The paint will dry pretty quickly making it easier to hold the hoop and paint the entire thing.
*You can also use an embossing heat gun to help speed up the drying process. I then went ahead and painted another coat to make sure it was all even.
While the hoop finishes drying, thread some bakers twine through a sewing needle for your pom pom garland. I used a pink and white twine to match the theme.
Thread the needle with the bakers twine through the center of pom poms one at a time. I used red and white to really pop off the wreath. Once you have enough strung, you can then space them out how you like them.
Once the hoop has dried, it’s time to attach your pom pom garland to the back of the hoop. I started at the top by tying one end of the garland in a knot and trimming the excess twine. You will have to play with the position and line it up even to match the other side. Once you have it lined up straight, glue the bakers twine to the back of the hoop.
I then stayed on that same side and glued the bakers twine down so it couldn’t be seen from the front. then move the garland across and glue the other side. Continue until you have it completely glued in place.
You can add a piece of ribbon to the top to hang it or just hang the hoop directly to your wreath hanger or hook. I love it without the ribbon which also happens to hang at just the right height.
I am absolutely in love with how this simple Valentine’s craft turned out. It was so simple and fun to make that I might just have to make more to hang on my inside doors and all my outside doors.
Now for those other amazing friends of mine that are showing off their creativity with even more wreath ideas. We definitely have got ya covered and your front door. 😉 And don’t forget like I mentioned before, we will be here EVERY month with a brand new wreath idea so stay tuned.
Thanks again for joining us! We will be sharing a new wreath once a month in 2017! Be sure to stop by all of the hosts to see what wreath we came up with for the month! Are you interested in sharing a wreath with us one (or more) months? We are accepting guest hosts! Email carrie (at) curlycraftymom (dot) com if you are interested!
Some of the links in the post above are “affiliate links.” This means if you click on the link and purchase the item, I will receive an affiliate commission. Regardless, I only recommend products or services I use personally and believe will add value to my readers.
This wooden reindeer stencil art is perfect for a homemade Christmas gift or to make for your own home Christmas decor.
The countdown is definitely on for Christmas at this point! I sure hope you have your Christmas shopping done or at least getting very close. I feel for ya if you are out in these crowds fighting the traffic. This year has been a fun one for me and Mark this year being able to buy for our 2 nephew’s first Christmas. Gifts are wrapped and nicely tucked under the tree just waiting for all the joy this Sunday.
With all the hustle and bustle of Christmas and shopping and cooking, we must not forget to take some time for ourselves and enjoy this season as well. I did exactly that when I found the adorable reindeer stencil from Cutting Edge Stencils that I used to make the wooden reindeer stencil art below.
Be sure to check out my full tutorial below and keep reading to see 9 other projects using this stencil and many others in a new and fun way from other creative bloggers. I was blown away with some of the ideas that I had never even heard of before.
I started by painting my wooden pallet wall hanging white with 2 coats. I wanted a white wash effect with some of the wood peeking through. Feel free to continue painting more coats depending on the look you want.
Then attach the stencil to the wood. I used washi tape which worked great for me and removed easily without pulling up any of the white paint. I would also recommend using painters tape.
Start painting the wood with the stencil in place with different colors until you are finished. I used foam spouncers for larger areas such as the head of the reindeer below.
With more intricate details I used different size paintbrushes and foam spouncers.
Let the paint completely dry and then you are ready to remove your stencil. I always hold my breath a little at this point until the stencil is removed to make sure I didn’t have any smudges underneath it.
I couldn’t be happier with the way this one turned out. It looks perfect for any decor theme and would make a great homemade gift or hostess gift as well. I just love it! I think I will have to make a 2nd one to keep for myself too.
Love this idea of using a stencil to get your own beautiful Christmas decor? Be sure to check out these other creative bloggers who have come up with ways to use stencils this holiday. I have to say I never even thought of some of them. I am so glad they shared their ideas and now have my wheels turning.
Let me know in the comments below which project you would love to try and enjoy a little crafting Christmas fun. And a huge thank you to Cutting Edge Stencils for sponsoring this post and providing me with the most adorable reindeer I could imagine.
Come enjoy this rustic Christmas home tour with touches of greenery, burlap, sparkle, and more for gorgeous Christmas decorations.
It is definitely no secret that Christmas is my most favorite time of year. I become like a child again squealing and dancing around the house. No seriously. It’s true.It takes all I can to just wait until Thanksgiving week before putting up my Christmas decorations.
This year I was happily surprised to run up on several good deals at some of my favorite stores for some beautiful new additions to my Christmas decor. Let’s dive in and let me take you on a tour. But first grab yourself a fuzzy blanket and a cup of hot cocoa. Don’t forget the marshmallows.
Rustic Christmas Home Tour
The tree!! Let me just be honest for a minute. This tree is old. A portion of its lights no longer work, and we have to add extra to that one spot so no one can tell. It’s more skinny than I prefer. Yes, I could buy a real tree which we have before and I prefer. The only problem is I can’t put it up as soon as I want without it dying too soon before Christmas.
But I can honestly say that I have never loved this tree more than I do this year all because of one addition. This fabulous burlap ribbon that I found at TJ Maxx, which happens to be one of my most favorite stores. I saw it and knew I had to use it for something. I have never put ribbon on my tree like this and now I’m addicted.
The burlap with the touch of “Merry Christmas” really did the trick. Plus it helps to hide any of those spots that seem bare.
If the ribbon or tree couldn’t be any more gorgeous on their own, I found this buffalo plaid tree skirt at Hobby Lobby that I am absolutely in love with. I might just be a little obsessed with buffalo plaid again this year. The boxes sitting to the right are from TJ Maxx and will be perfect to hold gifts under the tree.
To top off how amazing that tree skirt is, Hobby Lobby even had matching stockings! I know, can you even believe it? I was already on the hunt for new stockings that would match for me and Mark. These are perfect!
Another great find was at Michaels where I bought this red and cream felt ball garland. It added just the right pop of color to my garland on my mantle. The miniature tree came from Michaels last year, but I’m sure they have more this year too. The burlap tree is one I made two years ago that you can find the tutorial for HERE.
I am also slightly obsessed with decorative pillows. I found the burlap pillow with the bells on clearance after Christmas last year. The old truck pillow came from the Target dollar spot and has buffalo plaid on the back of it making it reversible which I just love.
No matter how great everything you have seen before may seem, this next section is by far my most favorite. This leather bench came from Big Lots and lives in my entryway. I added the miniature trees and lantern that all came from Michaels.
The buffalo plaid sack with the gold reindeer is just perfect here with the reindeer art above that all came from TJ Maxx. The sack is supposed to be used as a gift bag, but I placed a couple blankets in it to make it stand and love the way it turned out. The gold reindeer head is one that I found in the paper mache section of the craft store and spray painted gold. How inviting is this little seat?
Below is a picture of some of my favorite ornaments and a little nook outside that I have on the front porch. I really just can’t get enough of Christmas.
I hope you have enjoyed this ride with me and warmed up with your cup of cocoa. Please share your Christmas decorations with me. I would love to see them. Tag me on social media and let me know. I love to get ideas from y’all too. Merry Christmas!!!
Some of the links in the post above are “affiliate links.” This means if you click on the link and purchase the item, I will receive an affiliate commission. Regardless, I only recommend products or services I use personally and believe will add value to my readers.
https://www.thesoutherncouture.com/staging/3818/wp-content/uploads/2016/11/Rustic-Christmas-Home-Tour-FI.jpg400800Bethanyhttps://www.thesoutherncouture.com/staging/3818/wp-content/uploads/2017/09/logo_freelance.pngBethany2016-12-01 05:00:422016-11-30 13:35:37Rustic Christmas Home Tour
Get ready to turn your Christmas decorations into spectacular with this giant candy cane decoration using styrofoam.
I know y’all are probably sick of hearing me say this, but I can’t help it. Christmas is my most favorite time of year! I turn into a kid again and get excited over every little detail. As you can imagine at this point, I find any reason to buy or make my own decorations.
So a few months when I discovered all that you can do with styrofoam, I knew that I had to make a Christmas project which is where this giant candy cane came from. I was literally blown away with the possibilities that I never even knew existed. I couldn’t believe that I had not known about this before and all the fun I had been missing out on.
I sure don’t want the same for you, which is why I have been going crazy wanting to show you and giving you sneak peeks of this giant candy cane decoration using styrofoam all the time on my instagram stories, @the_southern_couture. With a few supplies and an easy technique, you can truly build just about anything using styrofoam. Plus no one will ever know that it’s really styrofoam; that’s the best part.
Gather all your supplies and have them ready and easily accessible. Now is also a good time to think about what paint colors you would like to use. I used brown and 2 different shades of red to give a rustic appearance that matched the rest of my Christmas decor. When you sand your project at the end, you will want to think about what colors you will want to show through.
Step 1
Measure and mark the outline for your candy cane on the foam sheets. I used a ruler and long piece of wood and made the height to be 36” with the width of it being 3 ½ “. The trickiest part was the curve at the top. I continued measuring and playing with the design some until I liked the way it looked.
Use a pencil or marker to draw the outline of the candy cane. I used a ruler to help give me straight lines.
Step 2
Using the FloraCraft® StyroCutter® Plus, start cutting out the candy cane. You will need to allow it to heat for about 15-30 seconds before using. Be careful because it does become very hot.
Run the cutter parallel to the styrofoam on the lines you marked earlier as a guide to cut it out. Do not force the cutter through the foam as it will bend the end of it. Let it glide through gently and watch the styrofoam melt under the heat to release your shape.
This was the coolest part for me to see the FloraCraft® StyroCutter® Plus and how easily it worked. Trying to use a knife would have been a nightmare after using this gadget.
Step 3
Apply your Smooth Finish putty using a putty knife to cover the entire candy cane. You will want to use it liberally and not leave any foam showing through. Do not worry about having it smooth at this point. You only want to have the candy cane completely covered.
Be sure to putty it over old newspapers because it will get messy and even more so when you have to sand it down.
Depending on where you use this for decoration, you may only need to cover the front and sides. I didn’t cover the back of mine.
Step 4
I let mine dry completely overnight and then started sanding it down until it was smooth using sandpaper. If you notice any spots of foam that are peeking through, you may need to re-putty those places and sand down again until you have a smooth and even finish.
Step 5
Next measure the stripes for your candy cane using a ruler. I marked them every 4 inches on one side. Place your painter’s tape in diagonal lines to give you crisp, clean lines.
Again the tricky part is the curve at the top. I searched online and looked at several different candy canes. The stripes in the top curve were all different so I don’t think it really matters or has to be perfect.
Step 6
Start painting the foam using a paintbrush with your first base color. I chose the brown as I mentioned before for a more rustic appearance that matched the rest of my Christmas decor. *I had originally planned to sand down the paint with some of the brown peeking through but it didn’t turn out the way I planned. It happens sometimes, right?
Once it dries completely, continue with your next coat of paint until you have all the colors you like.
Step 7
With the painter’s tape still intact, sand over the paint lightly in certain places for a distressed and rustic appearance if you choose. Once you start sanding, you can decide how distressed you want it to be. You can also skip this step if you want more solid and bold pops of color. *As I mentioned above, I painted the brown base layer but decided to not distress it in the end.
Step 8
Remove the painter’s tape and see how crisp those paint lines are. This is the part that always makes me nervous as I hold my breath hoping the paint didn’t run. It is totally worth it though when the lines are so crisp and pretty.
You don’t have to worry about painting the white stripe either because of the Smooth Finish putty already being white which saves another step.
Step 9
Add a festive ribbon and some decoration to really top it off. I love the rustic look of this ribbon with the pop of red. This floral pick also adds some shimmer with a rustic feel as well.
Using some miniature trees with the burlap bottoms, a red rocking chair, and other rustic decorations, this giant candy cane decoration is the perfect addition. I will also have to add one to my front porch in the galvanized bucket.
I made these burlap jingle bell trees last year. Check out the full tutorial to make your own. They match perfectly with the rustic style.
Because the styrofoam is lightweight, you could even hang these on the wall. Try your hand at this fun technique. You will become addicted to finding what other fun projects you can come up with next. I still am in shock at all the fun stuff you can make with styrofoam.
Let me know in the comments below if you have any ideas for future projects you would like to see me try. I would love to have any ideas.
This post was sponsored by FloraCraft® in exchange for product. All opinions are mine alone. I pinky promise!
Grab yourself a treat and make this adorable Football Themed Popcorn Box Craft.
In my household, Fall means football. Mark and I watch football every weekend and even throughout the week for that matter. We also have a fantasy football team. We mean business. 😉
So when I had the chance to team up with some pretty awesome bloggers to transform a popcorn box from World Market into something new, I knew exactly what that would be. A football field with a field goal and all.
This idea is perfect for any game night and especially when guests come over to watch the big game. Keep this idea for a superbowl party to serve different snacks out of too. And you can even get your kids involved with helping you make them.
Supplies:
World Market Popcorn Box
Green scrapbook paper
Tape
White washi tape
White chalk marker
Black pom pom strand from Expo International
Hot glue gun and glue sticks
Yellow pipecleaners
Brown scrapbook paper
Miniature clothespins
Lay your box down flat and trace the outline of the box onto the green scrapbook paper and then cut out.
Attach to the popcorn box using tape. Apply white washi tape to one corner of the box. I found it easier to work with my box still lying flat.
I added the numbers 5 and 0 for the 50 yard line using a white chalk marker. I hot glued the black pom pom strand to the top for a little extra flair.
For the football, I cut out a small football shape from a piece of brown scrapbook paper. Use a white chalk marker to add the laces to the football. Attach to a miniature clothespin using a hot glue gun.
Cut a yellow pipecleaner for the top posts of the field goal posts. Use another pipecleaner to attach the two together.
Measure how long you want the field goal posts to stand up in the popcorn box and attach to the inside of the box using hot glue.
Clip the football onto the side of the box or even on the field goal posts.
Add your popcorn or favorite snack mix for the perfect game day treat with a little extra flair at the same time for a TOUCHDOWN!!
Be sure to enter the giveaway below thanks to our sponsors and stick around for more popcorn box ideas from other talented bloggers.
I absolutely love this craft and can’t wait to think of other creative ways that I can transform the popcorn boxes. Be sure to check out the other bloggers below and all their ideas. You won’t believe how unique some of them are. You may even leave wondering why you never thought of them yourself before.
This post is sponsored by World Market, AdornIt, Kunin Group, Udderly Smooth, Tombow USA, Expressionery, Ellison/Sizzix, Expo International, and Oriental Trading.
This shop has been compensated by Collective Bias, Inc. and its advertisers. All opinions are mine alone. I pinky promise! #CoffeeCreamerCombos #CollectiveBias
Get ready for the season with a Fall Themed Coffee and Creamer Station that is perfect for hosting guests or enjoying for yourself.
Falling leaves, cozy blankets, fuzzy slippers, Fall festivals, warm coffee… These are all things FALL that make my heart and soul happy. I always tell my husband Mark that you know it’s Fall when I pull out my leopard print slippers.
I can never seem to get enough of Fall. Fall seems to go by so fast so I really make an extra effort to enjoy every minute of it. Part of that fun comes down to a warm cup of coffee in my favorite mug!
When the temps start dropping, there is nothing more comforting and soothing than a warm cup of coffee. Plus I always look for the fun seasonal flavor coffees and coffee creamers. It’s those little things in life that make me happy. I’m really not too hard to please.
All this coffee drinking got me to thinking about how I could enjoy it not just in the Fall but all the way through the holiday season. We are always seeing ideas for hot cocoa bars, but I think a coffee and creamer station would be even more fun to have set up when guests are coming over.
Fall Themed Coffee and Creamer Station
You can’t have the station without having the coffee and creamer so let’s start there first. Head over to Kroger and get all the essentials you will need.
I picked up several flavors of the Dunkin Donuts® Bakery Series® and the International Delight® Coffee Creamer. I love having so many different seasonal flavors to pick from so my guests will have whatever their taste buds desire.
I chose the vanilla cupcake and chocolate glazed donut coffee flavors along with the salted caramel mocha and caramel creamers. These could really make some interesting flavor combos for a tasty cup off coffee.
Place a piece of burlap on your table top and trim to fit the table if needed. This will help to add a little rustic feel to your station too.
I placed several cake stands on the table to place pots of coffee or your different bags of coffee so guests know their option. I really wanted to make the fun flavors stand out. And don’t you just love this chalkboard pumpkin. I spray painted it with chalkboard paint and wrote on it using a chalk maker. One of my favorites!
The best part of the coffee bar is having flavored creamers and toppings to really put the icing on the cake. I love to use small containers for sugar, half and half, creamers, etc.
A Fall themed coffee station cannot be complete without adding a few touches of pumpkins and rustic charm. I placed an umbrella stand that I already had around the house behind the station and hung a wreath. The wreath was one of my finds at a thrift store. It was made from pages of a book, and I just fell in love with it the second I saw it.
Your guests will thank you for such a fun and adorable way to enjoy a delicious cup of coffee. There is just something special about having a close friend over for chit chat and coffee. The two just seem to go together.
You will not want to miss out on these fun holiday flavors while they last. Pick yours up today at Kroger and have some fun mixing different flavor combinations together. Check out all the flavors you can find HERE. Plus check out more flavor combinations HERE for fun ideas. What would be your favorite seasonal flavor go-to? Let me know in the comments below.
https://www.thesoutherncouture.com/staging/3818/wp-content/uploads/2016/09/Fall-Themed-Coffee-and-Creamer-Station-FI.jpg400800Bethanyhttps://www.thesoutherncouture.com/staging/3818/wp-content/uploads/2017/09/logo_freelance.pngBethany2016-10-05 05:00:102016-10-07 22:01:55Fall Themed Coffee and Creamer Station
Decorate for fall with a twist with these chalkboard hand lettered pumpkins.
Fall is just the start of my most favorite time of year all the way through the first of the year. There is so much to celebrate and enjoy. Peppermint mocha coffee, peppermint sugar scrub, peppermint ice cream… I may love peppermint a little too much as it gets closer to Christmas.
I’m not much of a pumpkin spice girl except for the cream cheese pumpkin rolls. So today I’m going to bring out the pumpkins anyways and get you started decorating for Fall.
I love having different style pumpkins to use to decorate besides just the traditional jack-o-lanterns and what not. These chalkboard hand lettered pumpkins are perfect right now with all the hand lettering trends going on too.
Supplies:
Artificial pumpkins
Chalkboard spray paint
Chalk or chalk markers
Spray the pumpkin with multiple coats according to the spray paint canister directions. *I recommend using the chalkboard spray paint instead of trying to paint them with a brush and chalkboard paint. This makes it so much easier.
Using chalk or a chalk marker, write and decorate your pumpkin how your heart desires. Try writing a phrase or a family monogram. I even just drew a swirl of designs on top of one similar to a vine.
I placed mine on the front porch with other pumpkins and flowers designed especially for Fall to take me right up to Thanksgiving!
Be sure to check out my Fall front porch decor as well for more ideas that won’t break the bank but will also look beautiful with these hand lettered pumpkins.
Enjoy this beautiful season of giving and love. I hope you can practice your hand lettering skills as well on this chalkboard pumpkin. It is definitely one of my favorites!
Some of the links in the post above are “affiliate links.” This means if you click on the link and purchase the item, I will receive an affiliate commission. Regardless, I only recommend products or services I use personally and believe will add value to my readers.
This post was originally published on Dawn Nicole Designs on November 5, 2015.
This shop has been compensated by Collective Bias, Inc. and The Coca-Cola Company. All opinions are mine alone. I pinky promise. #ShareASong #CollectiveBias
Celebrate your Dad this year with these FREE Father’s Day printable gift tags. Just grab some Coca-Cola bottles with the Share a Song music lyrics for the perfect treat.
Song lyrics, your favorite song, a karaoke go-to? Music has affected each of us in a different and unique way more than we probably even realize. You can hear a song start playing and all of a sudden you are taken back to a special time such as your wedding day, a favorite concert, etc.
So when I saw that Coca-Cola had these specially printed bottles at Target with over 70+ music lyrics to be found for their Share a Coke and a Song campaign, I couldn’t wait to grab several and give them to my close family and friends.
When reading some of the lyrics, I immediately started walking down memory lane and singing the tunes out loud. It was a blast to go through them all.
One particularly stood out to me that read, “Ain’t no mountain high enough.” My Mom, sister, and I would sing this song to the tops of our lungs with a hairbrush for a microphone throughout the house. We loved it and felt like rockstars.
Another lyric read “All I do is win.” Mark and I have sung this song so many times and started dancing like crazy idiots whether we are in the car or running through the house. It just automatically makes us start singing and acting goofy. Good times that we will never forget.
This summer you can get your special bottles as well and share more than just a drink but a memory too. We all want something refreshing to drink on a warm day so why not cool down with a friend and share a Coca-Cola with a special music lyric.
Buy your bottles at Target and have the chance to get exclusive Music Artist Content and even a 25% off offer when you use the Cartwheel app. To receive your music content, just tweet @ShareMoreMusic with your 20oz Coca-Cola lyric, followed with #ShareASong. @ShareMoreMusic will then respond with a link to access the 25% off Cartwheel offer AND the Music Artist Content from Target.com.
I simply couldn’t wait to share these FREE Father’s Day printable gift tags with you just in time for Sunday. Each tag has a special music related quote. Every Dad can appreciate a cold Coca-Cola with a sweet note from their children.
One tag reads, “You are the RHYTHM that keeps us going.” Every Dad has a special job of caring and providing for their family. Let them know you appreciate them.
For your husbands, I have a sweet tag as well that reads, “You make my HEART skip a beat.” Let him know how special and sexy it is to watch him father your children. Plus, he will enjoy the cold drink too.
Keep reading below to see how to put your special gift together and print your FREE tags too.
FREE Father’s Day Printable Gift Tags
Supplies:
Coca-Cola 20oz Share a Coke and a Song campaign bottles
Print your free tags HERE and cut them out. Use a hole punch to make a small hole at the top of the tag.
Thread red and white bakers twine through the opening and wrap around the top of the bottle. Tie into a knot to secure in place. Then trim the ends.
Add a black and white striped paper straw to the back of the bottle with tape leaving it peeking out from behind for an extra touch.
Add these sweet bottles and tag that is full of memories for you and your Dad or husband and place it inside the gift bag with their present. And that’s all there is to it.
Now you just need to RSVP for the Coca-Cola Share a Coke and a Song Twitter Party on June 9th for an opportunity to unlock even more surprises from Coca-Cola and Target. Get all the rules HERE. Let me know in the comments below what your favorite song lyrics are. I would love to hear what special memories they bring you too.
Also if you have not already, please join me on Facebook, Pinterest, Instagram, and Twitter. I would love to hear from you with any comments, suggestions, or ideas you may have.
P.S. Please share this post with others if you enjoyed it and found it helpful. We love when you pass on goodness to others.
https://www.thesoutherncouture.com/staging/3818/wp-content/uploads/2016/06/Coke-FI.jpg400800Bethanyhttps://www.thesoutherncouture.com/staging/3818/wp-content/uploads/2017/09/logo_freelance.pngBethany2016-06-14 05:00:432016-06-13 16:37:37FREE Father’s Day Printable Gift Tags