Check out these simple Christmas gift wrapping ideas to take your packages to the next level with minimal effort.
Thank you to DaySpring for sponsoring this post. All opinions are mine alone. I pinky promise! Some of the links below are “affiliate links.” This means if you click a link and purchase an item, I will receive a small affiliate commission that helps me to be able to continue with this blog and hopefully continue to inspire you as well.
I am a total gift wrapping nerd! I’m actually obsessed with it. I love to pull out all the gifts and wrapping goodies and wrap to my heart’s content in one day. Of course while I am watching a Hallmark Christmas movie too. 😉 It doesn’t have to be complicated or expensive either. I can’t wait to share these simple Christmas gift wrapping ideas with y’all today too.
First of all make sure you have some killer wrapping paper that is not only beautiful but also good quality. The last thing you want is your paper tearing when trying to get crisp edges. I have been so impressed with the gift wrap from DaySpring. And I’m not just saying that! I have used so many different brands before and this is one of my top favs!! Durable and gorgeous while also being reversible!!
They also have some beautiful gift bags that come with tissue already in the bag ready for you to go. This is ideal for those last minute gifts or White Elephant Christmas party games that totally slipped your mind.
For my wrapping supplies today, I am also using gift tags that were part of DaySpring’s new Holiday Helper set. It comes with gift tags to match the wrapper paper, two different designs of cards, and a notepad. The work is really taken care of when everything is already matching. Plus this week only use the coupon code FREESHIP for FREE shipping on DaySpring’s entire site.
I also added some other goodies I found in my stash including washi tape, bakers twine, mini bottlebrush trees, mini wreaths, bells, mini clothespins, and more.
Now check out the video below to see how all these pretty packages came together!
This year’s wrapping party is going to be so much fun! Who else wants to join me with some hot cocoa, a Christmas movie, and wrapping fun?! Also don’t forget to check out the wrapping supplies from DaySpring while you can get free shipping too! God bless!
If you are looking for some fun Christmas projects, then look no further with this round-up of personalized Christmas projects and DIY gifts.
Thank you to Cricut for sponsoring this post. All opinions are mine alone. I pinky promise! Some of the links below are “affiliate links.” This means if you click a link and purchase an item, I will receive a small affiliate commission that helps me to be able to continue with this blog and hopefully continue to inspire you as well.
Christmas is in the air and hopefully alive and well in your crafting space and home because today’s post is full of Christmas projects and DIY gifts. There is nothing quite like a personalized project that really makes it special and meaningful which is why I love this personalized tea towel with leather ornament gift tag. I made it using my Cricut Maker and shared the tutorial last month.
When something has been first of all handmade and then personalized for just you, the gift is one that you will never forget. I love that the Cricut Maker makes this dream a reality with so many different tools, supplies, and designs in the Cricut Design Space.
Let’s get to this fun round-up and start some Christmas crafting…
I hope you enjoyed this amazing round-up and found some ideas to try with your Cricut machine. So many of these are perfect for DIY gift ideas too. Let me know below in the comments what is your favorite thing to make with your Cricut machine.
This is a sponsored conversation written by me on behalf of Cricut. The opinions and text are all mine.
https://www.thesoutherncouture.com/staging/3818/wp-content/uploads/2019/12/Round-up-of-Personalized-Christmas-Projects-and-DIY-Gifts-FI.jpg400800Bethanyhttps://www.thesoutherncouture.com/staging/3818/wp-content/uploads/2017/09/logo_freelance.pngBethany2019-12-04 05:00:522019-12-03 21:52:24Round-up of Personalized Christmas Projects and DIY Gifts
Watch this tutorial for your own DIY personalized Christmas tea towel using Cricut Maker that is perfect for a little handmade Christmas gift.
Thank you to Cricut for sponsoring this post. All opinions are mine alone. I pinky promise! Some of the links below are “affiliate links.” This means if you click a link and purchase an item, I will receive a small affiliate commission that helps me to be able to continue with this blog and hopefully continue to inspire you as well.
Christmas is coming!! So let’s not stress at the last minute when it comes to trying to find the perfect gift for that special someone. I’ve got you covered today with this adorable personalized tea towel that is simple and easy to make. What’s even better is that you can customize it with anyone’s initial and really make it their own thanks to the Cricut Maker.
I love having a handmade gift that is more personal than just picking up a random gift card. These towels are perfect for teachers, coworkers, neighbors, and more. I have special women in my life that love spending time in the kitchen and cooking for their families. I thought these would be great for them to see when doing just that.
Plus it’s like two gifts in one with this leather engraved gift tag that can also be used as an ornament on their tree each year. I used the Maker QuickSwap tools with the engraving tip which made it easy peasy. I can’t even believe the Maker can cut out leather and over 300 other materials.
Let’s get started making our own DIY gifts in time for Christmas. You can grab the whole cut file HERE in design space and then personalize it for anyone before cutting it out.
Check out the video below to see a little bit more in detail and up close how it all came together.
With the iron-on designs, think outside the box when using them. You don’t have to use them as a whole design, but instead you can cut them up and use them how you like. You can also get more bang for your buck this way to make more towels.
I layed out the towels and iron-on designs to get an idea of how I wanted them to look. Then I measured for the monogram iron-on and cut it out using the Cricut Maker. Be sure to mirror your design in Design Space when using iron-on.
I used the EasyPress 2 to iron everything on and used the EasyPress mat underneath to protect my work surface.
I love these new QuickSwap tools for the Maker because now I can make just about anything with them. I loved being able to engrave these Christmas trees with the engraving tip while it also cut out the leather to make these gift tags.
I used a sharp crafting tool to make a hole through the leather ornament and scrapbook paper to add the twine for the gift tag. You could also have the Cricut cut out a small circle at the top of each one. Add the recipient’s name to the paper candy cane too.
Tie some ribbon around your towels and attach the candy cane tags. Then they can hang the candy cane ornaments on their tree once they have opened it.
I love that this tea towel can be made special for anyone with their family monogram. Plus it’s even more personal for those who love to get in the kitchen and bake Christmas cookies and all the yummy treats.
Make sure to check out the Cricut Maker and grab yours now so you can start making all the fun handmade Christmas gifts this year. Don’t forget to make something fun for your self too. God bless!
This is a sponsored conversation written by me on behalf of Cricut. The opinions and text are all mine.
Check out this Father’s Day gift ideas round-up for several gifts perfect for any Dad or special man in your life. There is also something for anyone’s interest or hobbies.
Thank you to DaySpring for sponsoring this post. All opinions are mine alone. I pinky promise. Some of the links below are “affiliate links.” This means if you click a link and purchase an item, I will receive a small affiliate commission that helps me to be able to continue with this blog and hopefully continue to inspire you as well.
June is the month for celebrating the amazing Dads and men in our lives. We are called to respect our husbands, fathers, and men. Today I’m dedicating this post to the amazing men in my life and specifically my husband Mark. And we can’t let Father’s Day pass without showing them how much we love and appreciate them.
I shared a Mother’s Day round-up of gift ideas in May and just couldn’t leave the men out. Check out the video below to see several fun gift ideas from DaySpring depending on their hobby or interest. Plus you get FREE shipping on Father’s Day gifts which is even better. Just use the coupon code DADSHIP.
In addition to the FREE shipping from DaySpring, today is the very LAST day to get your gifts delivered in time for Father’s Day so head over and grab something special now.
What do you think your Dad or husband would love to open Sunday? I would also love to hear what you admire most about your Dad or what the greatest lesson he has taught you. Let me know in the comments below.
https://www.thesoutherncouture.com/staging/3818/wp-content/uploads/2019/06/Fathers-Day-Gift-Ideas-Round-up-FI.jpg400800Bethanyhttps://www.thesoutherncouture.com/staging/3818/wp-content/uploads/2017/09/logo_freelance.pngBethany2019-06-10 05:00:322019-06-07 11:19:21Father’s Day Gift Ideas Round-up
Learn how to make keepsake letters to Santa with felt envelope using the Cricut Maker. You can cut the felt using the rotary blade and even draw your own custom stationery.
Christmas is HERE finally, and I seriously couldn’t be happier! I anticipate this time of year all year long. Seriously, I just can’t help myself. This year is particularly special now that I have my baby boy. It’s his first Christmas which means I get to experience the joy of seeing Christmas for the first time through the eyes of a child. There aren’t too many things much better than that.
As a fun and new tradition that we can start in our home this year, I had to design a fun keepsake letter to Santa for baby boy to send to the North Pole each year. Of course I know what he wants even though he is only 8 months old. Mommy and Daddy will fill out his letter for now. 😉 I can’t wait for you to see how this whole little felt envelope and letters to Santa stationery comes together. Grab the design and cut files HERE.
I used my Cricut Maker to literally do everything for me except actually writing the letter. It makes this whole project a breeze and something that would even be fun to give as a gift for another family to enjoy too. Check out this post HERE too if you want to know more about what all the Maker can really do.
To make it easier to walk through the steps, I created a video that does just that if you want to check it out too. Below you will also find more pictures and me sharing my heart behind this cuteness if you enjoy that too.
Once you open the project in Cricut Design Space, it will prompt you to follow all the steps to cutting out all of the different elements. Let’s start with weeding the iron-on vinyl. To weed the iron-on vinyl for the front of the envelope, I used my BrightPad. There are several intricate cuts which are so much easier to weed with this little beauty.
The Cricut Maker also cuts fabric and felt. It’s almost unbelievable. I used the rotary blade for both of these and the scoring wheel made it a breeze for the creases in the envelope when I put it together.
You can’t apply iron-on vinyl and fusible fabric any easier than with the EasyPress 2. I used the 6″ x 7″ and loved how it was done in less than a minute.
Once you have all the elements in place on the envelope, use a hot glue gun to assemble the envelope on the back.
Now what’s an envelope if it’s empty. You have to have the letters to Santa stationery. Your Cricut Maker will not only cut out the notecards but also write on the letters for the cutest design using the Cricut Pens.
Now all you need to do is have your kids fill out their letters and stick them in the felt envelope to be “mailed” to Santa Claus. I love the idea of having this every year for kids to fill out and then us Moms can keep them as a sentimental memory to look back at each year of what the kids wanted. You could even make an envelope for each child to store their letters in each year.
This is a sponsored conversation written by me on behalf of Cricut. The opinions and text are all mine.
https://www.thesoutherncouture.com/staging/3818/wp-content/uploads/2018/11/How-to-Make-Keepsake-Letters-to-Santa-with-Felt-Envelope-Using-the-Cricut-Maker-FI.jpg400800Bethanyhttps://www.thesoutherncouture.com/staging/3818/wp-content/uploads/2017/09/logo_freelance.pngBethany2018-11-28 05:00:272018-11-27 13:16:09How to Make Keepsake Letters to Santa with Felt Envelope Using the Cricut Maker
Get ready for those adorable trick-or-treaters with a Halloween party candy table using Cricut Maker. Learn how to make a candy bag, treat bags, and party decor.
This is a sponsored conversation written by me on behalf of Cricut. The opinions and text are all mine. I pinky promise! Some of the links below are “affiliate links.” This means if you click a link and purchase an item, I will receive a small affiliate commission that helps me to be able to continue with this blog and hopefully continue to inspire you as well.
We are officially starting the most fun and exciting season of the year with one holiday after another. Let’s kick these next few months of partying off with a bang. Cue the confetti! We shall begin with Halloween, adorable DIY Halloween costumes, and DIY Halloween crafts. I say we shall declare this year a handmade Halloween starting with my Halloween party candy table using Cricut Maker.
If you have ever wanted to throw a party that looked like something right out of a magazine but didn’t have the time to spend making every last detail perfect, then you have come to the right place. The Cricut Maker is here to make all those dreams come true. I recently shared 10 things I love about my Cricut Maker. Check out that post to see more goodness of all this incredible machine can do.
The Maker can cut hundreds of materials from chipboard to fabric to vinyl. I can’t wait to show you these specific ones today too. It even has a rotary blade that glides through fabric so easily. If you love to sew or what to learn more skills, you will find a huge library of sewing patterns in Cricut’s Design Space to really help out.
So let’s get this party started and let me show you how to create your own candy table that every kid of any age will enjoy. A candy table isn’t complete without lots of candy right? This canvas candy bag is my absolute favorite. My 2nd favorite thing is the “Child Candy Tax” rule especially when you get those peanut butter cups.
I made this bag using everyday iron-on vinyl and fusible fabric. Yes, the maker even cuts fabric. How cool is that? You can click HERE to go straight to Design Space and find the project there. Cut out your materials first. I used the fine point blade for the vinyl and the rotary blade for the fabric.
The font I chose for the everyday iron-on has some more intricate cuts which is why I love weeding it with the BrightPad. No more straining my eyes. And trust me when I say this is a lifesaver because there’s nothing worst than weeding the wrong part of your cut and having to redo it. (Not that I know from personal experience or anything. 😉 )
The picture below is my everyday iron-on vinyl placed on top of the BrightPad. You can see the cut lines so easily making it a breeze to weed.
I placed my cuts on the canvas bag and then used my brand new EasyPress 2 to iron them on. Another lifesaver! You can apply your materials in less than 1-2 minutes. No more elbow grease with the iron to get vinyl to actually adhere.
And while I’m talking about the new EasyPress 2, check out my recent post talking more about its features. I share a tutorial for making this embroidery hoop decor for my son’s nursery.
Now for that “boo-tiful” centerpiece. (See what I did there. I just crack myself up sometimes. 😉 ) That “boo” decoration is made out of chipboard. Yes, the Maker can cut chipboard. Click HERE to get the project in Design Space now.
Place the chipboard on the StrongGrip (purple) mat and tape it down using masking tape. This really helps to make sure the chipboard doesn’t move during the cut and mess up. You can easily remove the masking tape once it’s done.
You will use the knife blade to cut chipboard. *Be prepared to wait for the Maker to cut the chipboard as it makes numerous passes to really make sure it has been cut through completely.
After it finished cutting, I painted it navy blue and hot glued a small dowel rod to the back. Place a piece of styrofoam in the bottom of the canvas bag and then the dowel rod will stand easily inside the styrofoam. (This would also be cute to cut one for a wreath.)
I wanted kids to have a way to take some candy with them as they leave the party as a sort of party favor which is where these miniature gift bags come in handy. Cut your gift bags out HERE in Design Space.
I used the Maker scoring wheel to make it even easier to fold the cardstock to put these together. The scoring wheel gives an extra-deep score line.
I folded on the score lines and used an adhesive runner to attach the bottoms and sides. For the pumpkins, I used Cricut’s cardstock and deluxe paper. For the word “boo” on the pumpkins, I used the Cricut pens and the Maker to write it out for me. Adhere the pumpkins to the front of the bags and tie bakers twine through the holes for the handles.
The candy corn decorations are a craft I made several years ago. You can find the full tutorial HERE.
Now you just need to add some candy and a few pumpkins and you are all set for a fun Halloween party candy table. Now let’s all give a round of applause to the Maker for doing just about anything I need it to for any occasion.
This is a sponsored conversation written by me on behalf of Cricut. The opinions and text are all mine.
https://www.thesoutherncouture.com/staging/3818/wp-content/uploads/2018/09/Halloween-Party-Candy-Table-using-Cricut-Maker-FI.jpg400800Bethanyhttps://www.thesoutherncouture.com/staging/3818/wp-content/uploads/2017/09/logo_freelance.pngBethany2018-09-26 05:00:262018-09-25 19:54:23Halloween Party Candy Table using Cricut Maker
It is never too early to start preparing for Christmas fun now so why not start with some early shopping and planning to kick off the celebration. Check out these goodies to share with your family today.
This post is sponsored by Dayspring. All opinions are mine alone. I pinky promise! Some of the links below are “affiliate links.” This means if you click a link and purchase an item, I will receive a small affiliate commission that helps me to be able to continue with this blog and hopefully continue to inspire you as well.
Just the small task of typing “Christmas” out for this post has made me so giddy and excited inside. I love and adore Christmas so much that I wish we could truly celebrate Christmas all year long. Maybe I should just move to one of those Christmas towns you see in the Hallmark movies. I’m sure they exist, right?
So when Dayspring asked me to check out some of their goodies for Christmas this year and share them with y’all now, I couldn’t wait! It was truly like Christmas morning getting that package on my front door. You are going to love what was inside and being able to start some fun and new traditions with what they have.
Check out the unboxing video below to see what all was included more up close and personal. Then come back here to find out where you can get yours.
Below are links to the items that were included so you can check them out here and pick up a few things. Early Christmas shopping never hurt anyone!
https://www.thesoutherncouture.com/staging/3818/wp-content/uploads/2017/09/Start-Preparing-for-Christmas-Fun-Now-FI.jpg400800Bethanyhttps://www.thesoutherncouture.com/staging/3818/wp-content/uploads/2017/09/logo_freelance.pngBethany2017-09-22 05:00:222017-09-21 19:29:49Start Preparing for Christmas Fun Now
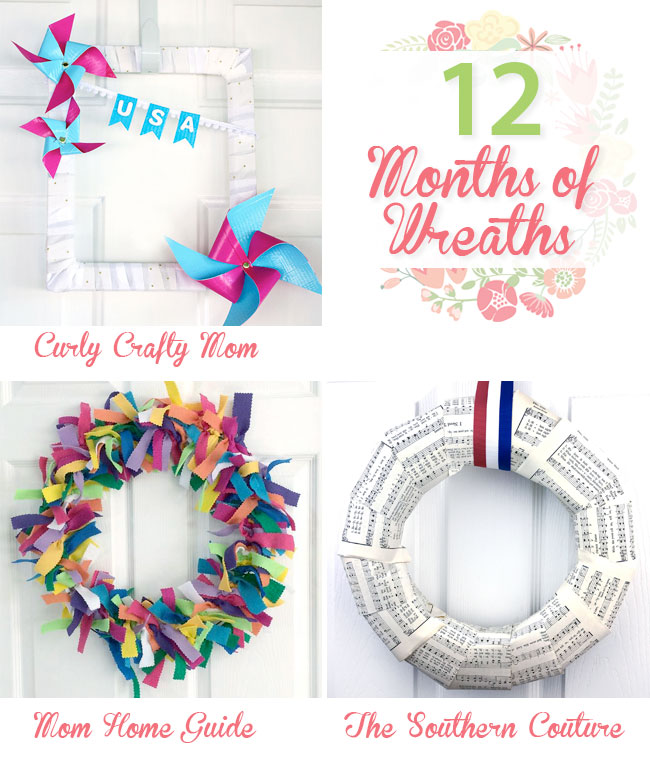
Check out this patriotic wreath tutorial using old hymnal pages and just a few basic supplies. You can make this wreath in less than 10 minutes.
This post is sponsored by FloraCraft. All opinions are mine alone. I pinky promise! Some of the links below are “affiliate links.” This means if you click a link and purchase an item, I will receive a small affiliate commission that helps me to be able to continue with this blog and hopefully continue to inspire you as well.
Who doesn’t love a good project or craft that you can literally make in less than 10 minutes. I know I do. And then when it’s a gorgeous wreath, it’s even better. Wreaths don’t have to be complicated or expensive.
That’s why I’m so excited to bring you this patriotic wreath tutorial using old hymnal pages just in time for July 4th. Hymnals make me think of our beautiful church and faith that our country was founded on. What else could be more fitting for a wreath this time of year? *Plus stick around for more ideas from a couple of my friends for part of our 12 Months of Wreaths Series.
Check out this video showing you how to make your own. More written details are below.
I got these old hymnal books that I used from my grandfather before he passed away which makes them even more special. You can find them at local thrift stores sometimes. Just keep your eyes out. If all else fails, you can also use regular book pages. Cut the pages in half in small strips.
Wrap the strips of the hymnal pages around the wreath attaching each one to the back using the floral pins. These pins are amazing. I can’t believe I hadn’t discovered them already. They are so quick and easy to use.
Wrap a ribbon around the top and tie in a knot. Hide the knot to the back of the wreath using a floral pin.
Then all you have left to do is just enjoy this beauty and hang it for all to see.
The great part is you don’t have to spend a lot of time making it either. I just love the simple touch of patriotism!
Now if that wasn’t good enough, be sure to check out the other wreath ideas below from my friends for this month’s wreath series.
Thanks again for joining us! We will be sharing a new wreath once a month in 2017! Are you interested in sharing a wreath with us one (or more) months? We are accepting guest hosts! Email carrie (at) curlycraftymom (dot) com if you are interested!
Make sure to check out these wreaths that you could make for a fun summer craft project. Perfect to even make with your kids too. I hope you enjoy! Please let me know in the comments below if you decide to try one of these. I would love to see a picture too.
https://www.thesoutherncouture.com/staging/3818/wp-content/uploads/2017/06/Untitled-design-8.jpg400800Bethanyhttps://www.thesoutherncouture.com/staging/3818/wp-content/uploads/2017/09/logo_freelance.pngBethany2017-06-19 00:05:222017-06-19 00:02:06Patriotic Wreath Tutorial Using Old Hymnal Pages
Find out the answer to your question, “Will I be required to use cartridges with the Cricut?” and also a fun and simple tutorial using Cricut pens and cardstock.
Thank you to Cricut for sponsoring this post and making it possible for all of us to enjoy crafting so much more. All opinions are mine alone. I pinky promise! Some of the links below are “affiliate links.” This means if you click a link and purchase an item, I will receive a small affiliate commission that helps me to be able to continue with this blog and hopefully continue to inspire you as well.
So many people love the idea of having a Cricut cutting machine and everything they could make. Then they get their machine but still have so many questions and feel overwhelmed not knowing where to even start. One of the most popular questions people have is “Will I be required to use cartridges with the Cricut?”.
Will I be required to use cartridges with the Cricut?
I am here to answer that question and share a step-by-step tutorial to get even the most beginner started crafting in no time and in confidence. But first make sure to check out my Cricut Intro post if you are interested in more about what the Cricut is exactly and what all it can do.
The previous Cricut machines would require cartridges at times to be purchased and placed into a slot on the machine which could then be accessed directly on the machine and cut out. The more updated machines still allow you to use previous cartridges with a slot on the machine, but it certainly isn’t necessary. The Design Space software gives you access to tons of images and files that you can cut. You can also purchase an Access Membership giving you access to the files at a discounted price.
The other beauty of Design Space is the Make It Now Projects. You will find tons of projects with cut files and directions to get started right away. You don’t have to have a cartridge at all with these. You don’t even have to think up your own idea. Get started using others creations and have some fun of your own.
One category of the Make It Now Projects that I want to feature are the Cards. You can find tons of ideas for just about any card you want. Everything is already there and just waiting for you to cut them out.
For cardmaking, you are going to need some pretty cardstock. Let me suggest a couple different packs that Cricut has. The quality is superb with a thicker paper that is sure to be durable and professional looking.
The beauty about Cricut and cardmaking is that the Cricut will not only cut out everything you need but also write any phrase or design on the card as well. Below is their Ultimate Pen Set full of bright colors and a white stand to even hold them all.
Another fun extra to use with cardmaking is Cricut’s Paper Crafting Set.
It includes:
Piercer
Quilling Tool
Edge Distresser
Craft Mat
This set is just a fun way to top things off and take your cards and paper projects to the next level. It truly is all in the little details.
Now that we have our supplies pulled together, let’s walk through step-by-step how to create Make It Now card projects in Design Space.
On the home page of Design Space, click on the right category box to see the full drop down menu of projects. I selected the Father’s Day cards.
You will see the supplies needed and directions to complete the card. You can customize the project but clicking the “Customize” button in the bottom right or click “Make It Now” to get started.
The next preview screen will show the different cuts and mats that will be needed. Press GO in the bottom right to start the process of loading your mat and cutting. *Don’t worry about knowing exactly what tools are needed for which mat. The software will prompt you when needing to change different colored pens or scoring stylus, etc.
The next screen will then walk you through loading your mat, making sure the machine dial is set correctly, changing the different cardstock and tools between each mat, etc.
Once all the cuts are done and the phrase is written, you just need to assemble your card as stated in the project directions.
This “Hello Sunshine” card is another Make It Now card project that is adorable and uses several different pens for some gorgeous color combos.
And that’s all there is to it. You don’t have to worry about understanding all of Design Space right away or having to buy cartridges to be able to use your Cricut. The Make It Now projects make it so easy to get started right away no matter what your experience level may be.
https://www.thesoutherncouture.com/staging/3818/wp-content/uploads/2017/06/Will-I-be-Required-to-Use-Cartridges-with-the-Cricut-FI.jpg400800Bethanyhttps://www.thesoutherncouture.com/staging/3818/wp-content/uploads/2017/09/logo_freelance.pngBethany2017-06-07 05:00:182017-06-07 09:40:37Will I be Required to Use Cartridges with the Cricut?
Check out these end of school year teacher gift ideas plus FREE printable gift tag just in time before summer break.
This post is sponsored by Dayspring. All opinions are mine alone. I pinky promise! Some of the links below are “affiliate links.” This means if you click a link and purchase an item, I will receive a small affiliate commission that helps me to be able to continue with this blog and hopefully continue to inspire you as well.
School’s out forever, School’s out for summer…As I’m writing this blog post, I couldn’t help but start singing these lyrics. Now you probably have them in your head too. Sorry about that, but at least Summer break is almost here.
That means it’s time to start thinking about your child’s teacher and what little token of appreciation that you can give them. I thought it would help you to mark one more thing off your list with a few gift ideas here and even a FREE printable gift tag to top it all off.
One thing I am obsessed with lately (and I think a lot of women are) is florals!! They have been popular in fashion and even decor. So when I found this set of coasters from Dayspring that has not only florals but also encouraging scripture, I knew they were the perfect solution.
All you need to do is tie them up with a little bakers twine for an extra touch and add the printable gift tag. (Keep reading to get your gift tag file.)
This coaster set will go along great with this next idea. How about a giant mug filled with all their favorite pampering accessories. We all know the school year can become tiring and draining, especially for the teachers. So it would be nice for them to have something to pamper themselves with.
Grab this giant mug with the chalkboard (which fits perfectly for teachers) and then more gorgeous florals. It’s the perfect size to really add lots of little goodies. Then they can reuse it later for a giant cup of coffee once school starts back or to hold colored pencils in their classroom.
I’ve included a sweet treat, bag of tea with tea “holder” (I think that’s what you call it.), lotion, and body spray. Some bath bombs would also be a great idea! Or maybe add in a gift card to the spa. Fill in the extra space with some paper grass and you have the cutest gift.
And then head over to grab your teacher goodies from Dayspring!!
You will also want to check out their Graduates section as many will be moving on to a new endeavor in their life and could really use the positive encouragement. Use the coupon code CONGRATS to get 25% off this section!
There will also be a special section with gifts marked down to $5, $10, and $15 through 5/20/17! (The coupon code cannot be applied here.)
https://www.thesoutherncouture.com/staging/3818/wp-content/uploads/2017/05/End-of-School-Year-Teacher-Gift-Ideas-Plus-FREE-Printable-Gift-Tag-FI.jpg400800Bethanyhttps://www.thesoutherncouture.com/staging/3818/wp-content/uploads/2017/09/logo_freelance.pngBethany2017-05-11 05:00:432017-05-10 07:23:14End of School Year Teacher Gift Ideas Plus FREE Printable Gift Tag